
When my brother and I started a D&D group, it was natural to bring our miniatures to the table. The desire for affordable miniatures led us to seek out fantasy board games such as the classic Hero Quest and lesser-known but fondly-remembered Dragon Strike. (Dragon Strike came with a VHS cassette filmed in hyperReality to set the mood. Fans and the curious will be happy to know you can watch the whole thing on YouTube. Thanks, Internet!) We usually did our tabletop gaming at another friend's house, and each week we carted over several foam-packed boxes of minis, not to mention a fine assortment of TSR-era rulebooks.
Our primary D&D campaign ended when I was an undergraduate, but I don't think I did any painting after high school. I did a few short-lived and one-off RPG sessions—and designed at least two systems—but time for tabletop RPGs fell away as I got deeper into higher education. Yet, since getting into designer board games many years ago, I know I have been saying that I want to get back into painting miniatures someday.
In a fit of mortality over the Winter break, I became determined to stop saying "someday" and instead to say "tomorrow." Over the next few days, I made several trips to the local art, game, and hobby stores and bought all manner of paints, brushes, and supplies. Since then, I have spent at least an hour painting nearly every night.
Part of what pushed me over the edge was Mice and Mystics. I bought it for the family as a Christmas gift, having heard great things about this cooperative fantasy board game.

I wanted to read the rules ahead of time, so I visited Plaid Hat's product page to download them. On the same page as the rulebook download is Jerry Hawthorne's Painting Guide, a five-page summary of how to paint the minis that come with the game. Hawthorne—the game's designer—lays out exactly what materials a prospective painter would need, and he describes some of the core techniques.
Reading the Painting Guide made me reflect on how, in my youth, I basically just put some paint on the models. It was fairly late in our painting years that my brother and I primed and sealed the figures, and we only did very rudimentary dark washes on undead figures. This was before YouTube, before the popularization of the World Wide Web. Hawthorne writes about drybrushing, lowlighting, inking, and spray paint— things I knew nothing about. However, unlike when I was a kid, now you can punch those into your search engine and discover an abundance of resources, tips, articles, and videos. Reading Hawthorne's guide and poking around the Web gave me the confidence to finally say, "Tomorrow is the day I paint."
As suggested in the Painting Guide, I started with the roaches and the rat warriors. I had never spray-painted anything in my life, so this was a bit of a gamble. I used poster putty to attach the figures to a paint stick and headed to the back porch.

I learned that although it may look like a calm day, the slightest breeze makes spray-painting rather tricky. Still, for my first time, I was pretty happy with it. I tried to make sure every bit was primed. After having done some reading, I think perhaps this was overzealous and led to my using slightly too much primer. This is learning-by-doing, however, and it was a big win for a guy who hadn't painted in two decades.

When I painted two decades ago, I used to just hold the minis in my fingers. I never thought of mounting them to a more manageable surface, but this comes up as a common technique on the Web. Wooden blocks are easy to find in my house, and so I picked out a few stout ones and affixed the roaches to them, using the same poster tack as earlier.

I followed Hawthorne's instructions as closely as I could, recognizing the roaches as low-risk models for trying drybrushing. I was proud of the results, although after having experimented with this technique even more since then, I already see that I was using too much paint. Still, the result is fine for what it is: a greedy little cheese-stealingbastards insects.

Next up in the Painting Guide are the rat warriors, and so I mounted them to the same blocks I used for the roaches.However, this made it awkward to get the paintbrush into the figures' undersides. The roaches are essentially all top, but the rat warriors require more brush dexterity. After a brief consultation with the resident craft wizard, my wife kindly affixed the rat warriors to corks using a low-temperature hot glue gun.
Drybrushing the rats was much more interesting than the roaches, given their texture. I followed the Painting Guide suggestion to do three brown and three grey, knowing that the variation would give me more experience. I was blown away by the efficacy of this simple technique, and I can see why it's so widely recommended as an easy way to add depth to a model. Here are the rat warriors after drybrushing and a few other details:

I was so happy with the drybrushing that I was terrified to take the next step: an ink wash. There's no Control-Z in painting, and it's not like I could rely on refactoring to fix any mistakes I made next. There's nowhere to go but forward, so I held my breath and began the inking.
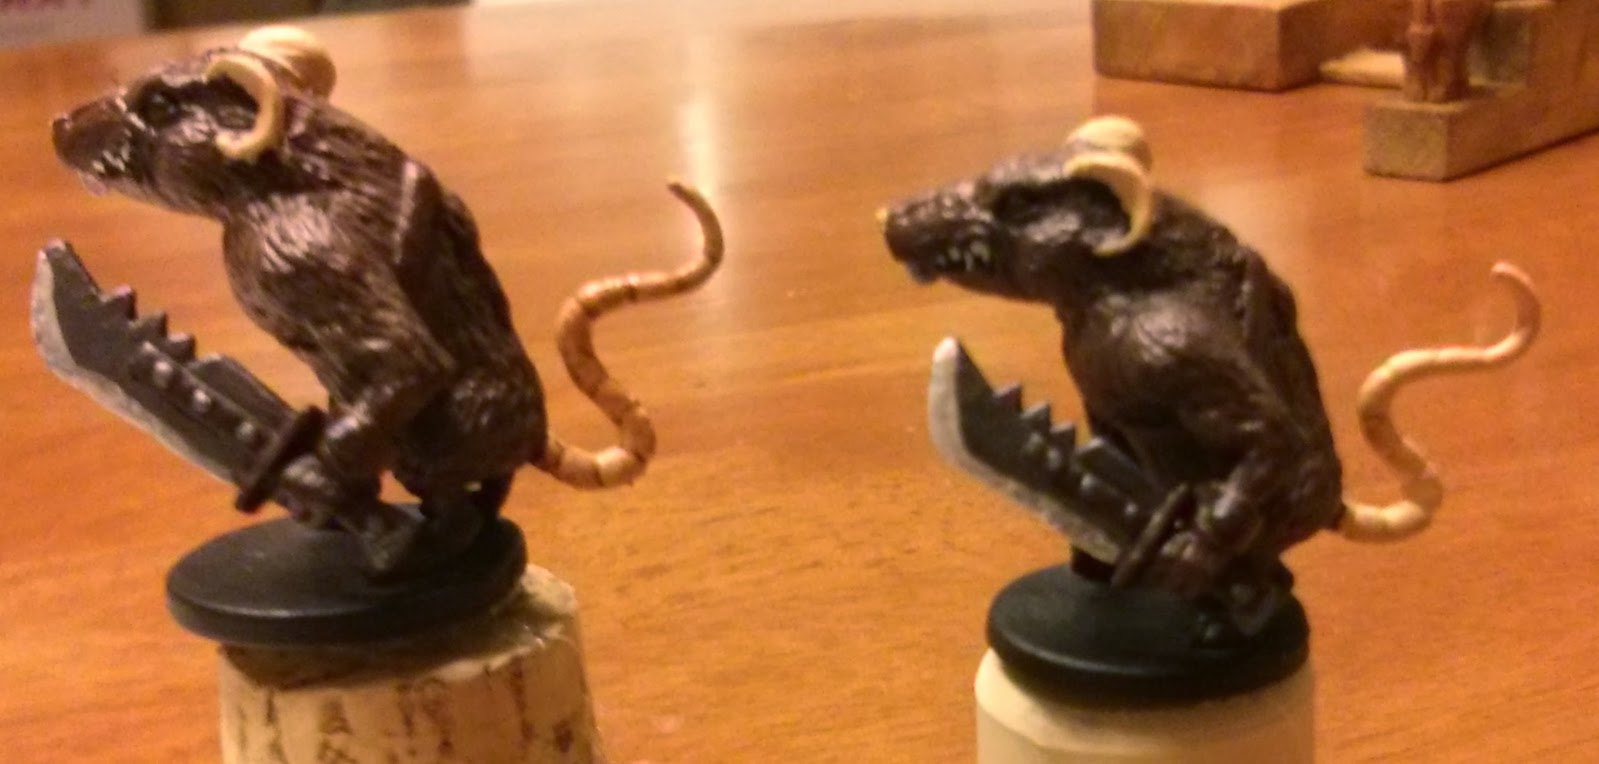
Fortunately, once again, the results were fantastic. Here is a picture that highlights the difference in the fur and tails: "after" on the left and "before" on the right.
Here are the rat warriors, with all the details complete, before varnish:


I wanted to read the rules ahead of time, so I visited Plaid Hat's product page to download them. On the same page as the rulebook download is Jerry Hawthorne's Painting Guide, a five-page summary of how to paint the minis that come with the game. Hawthorne—the game's designer—lays out exactly what materials a prospective painter would need, and he describes some of the core techniques.
Reading the Painting Guide made me reflect on how, in my youth, I basically just put some paint on the models. It was fairly late in our painting years that my brother and I primed and sealed the figures, and we only did very rudimentary dark washes on undead figures. This was before YouTube, before the popularization of the World Wide Web. Hawthorne writes about drybrushing, lowlighting, inking, and spray paint— things I knew nothing about. However, unlike when I was a kid, now you can punch those into your search engine and discover an abundance of resources, tips, articles, and videos. Reading Hawthorne's guide and poking around the Web gave me the confidence to finally say, "Tomorrow is the day I paint."
As suggested in the Painting Guide, I started with the roaches and the rat warriors. I had never spray-painted anything in my life, so this was a bit of a gamble. I used poster putty to attach the figures to a paint stick and headed to the back porch.
I learned that although it may look like a calm day, the slightest breeze makes spray-painting rather tricky. Still, for my first time, I was pretty happy with it. I tried to make sure every bit was primed. After having done some reading, I think perhaps this was overzealous and led to my using slightly too much primer. This is learning-by-doing, however, and it was a big win for a guy who hadn't painted in two decades.
When I painted two decades ago, I used to just hold the minis in my fingers. I never thought of mounting them to a more manageable surface, but this comes up as a common technique on the Web. Wooden blocks are easy to find in my house, and so I picked out a few stout ones and affixed the roaches to them, using the same poster tack as earlier.
I followed Hawthorne's instructions as closely as I could, recognizing the roaches as low-risk models for trying drybrushing. I was proud of the results, although after having experimented with this technique even more since then, I already see that I was using too much paint. Still, the result is fine for what it is: a greedy little cheese-stealing
Next up in the Painting Guide are the rat warriors, and so I mounted them to the same blocks I used for the roaches.However, this made it awkward to get the paintbrush into the figures' undersides. The roaches are essentially all top, but the rat warriors require more brush dexterity. After a brief consultation with the resident craft wizard, my wife kindly affixed the rat warriors to corks using a low-temperature hot glue gun.
Drybrushing the rats was much more interesting than the roaches, given their texture. I followed the Painting Guide suggestion to do three brown and three grey, knowing that the variation would give me more experience. I was blown away by the efficacy of this simple technique, and I can see why it's so widely recommended as an easy way to add depth to a model. Here are the rat warriors after drybrushing and a few other details:
I was so happy with the drybrushing that I was terrified to take the next step: an ink wash. There's no Control-Z in painting, and it's not like I could rely on refactoring to fix any mistakes I made next. There's nowhere to go but forward, so I held my breath and began the inking.
Fortunately, once again, the results were fantastic. Here is a picture that highlights the difference in the fur and tails: "after" on the left and "before" on the right.
Here are the rat warriors, with all the details complete, before varnish:
I decided next to prime the two big enemy figures—the spider and the centipede. I waited for a calm day, affixed the figures to a paint stick, and headed outside. Through some combination of inexperience and cold weather, it did not go well.I tried to completely coat the models, but because of all the bends and undersides, I ended up with way too much paint pooling into the nooks and crannies. (No pictures taken of this—too much shame.) On the positive side, this gave me the chance to learn something new: stripping! I put the two figures in Xtreme Kleen for a few hours and then took an old toothbrush to them. Most of the paint came off, but not all, and it was much more difficult than I had expected. I wonder if another solvent would have made it easier, but this is what was on hand, so it's what I used.
At this point, I had not yet sealed the roaches or rats because the local stores were out of Testor's Dullcote in a spray can, a product that is widely recommended. My bad experience priming the spider and centipede scared me away from wanting to spray anything, at least until it was warmer outside. I should note that this is when the temperatures were getting into the teens on their way to sub-zero. I made a trip to Toys Forever Models & Hobbies in Muncie, where I had never been before, to see if they had any brush-on primers and sealers. The gentleman behind the counter was very helpful, assisting me in navigating the wide assortment of paints, primers, and accessories. He had what I needed, so I came home excited to varnish my roaches and rat warriors.
I wanted the figures to be durable because they're designed for use in a game—they are not show pieces. Several articles recommended a layer of gloss varnish followed by Dullcote, which will take away the sheen. I tried this first on my roaches, and I have to say it was like magic. My Vallejo brush-on acrylic gloss varnish leaves the figures very shiny, but the Dullcote takes away the plastic look.
This little win got me ready for the spider and the centipede. The hobby shop only had white brush-on primer, so that's what I used, contrary to the Painting Guide's suggestion for black. The white primer dissolved some of the black that was still the minis, leaving them a sickly grey, but at this point, I needed to just move forward. I also discovered that Plaid Hat sells the Mice and Mystics miniatures without the game, so in the very worst case, I could destroy the evidence and buy replacement minis!
I started with a few layers of drybrushing on the models. The centipede came out much darker and redder than I expected, but this was a good experience in mixing custom colors and layering.
I was able to lighten up the centipede with some drybrushing, and both were greatly enhanced by some careful inking. Here they are, complete with evil little eyes, though not yet varnished.
I'm quite happy with how the inking enhanced the segments on the centipede. If I could paint it again, I would do a lighter color on the body but keep the strong inking. I am also happy with the very light brown drybrushing on the back of the spider. It's the most delicate drybrushing I had done to this point, and perhaps the first time I had really done it right.
The last set of figures to paint are the heroes. The recommendations in the Guide are much looser here, taking the reader through general steps but few specific colors or blends. I don't know whether Hawthorne saw this as intentional educational scaffolding or if he simply got tired of writing, but in any case, I had the freedom to succeed or fail on my own.
Good color schemes for each miniature are provided in the Mice and Mystics cards. The minis are not perfect matches for the illustrations, however, so some creative interpretation was required.
The first step—taken from the guide—was to prime the figures in white and ink the details to be dark. Hawthorne mixes his own inks from black paint, water, and Future Floor Wax. I did a bit of research to discover that Future Floor Wax is no longer sold under that name: over the last few years at has been rebranded as Pledge Floor Polish, but it is supposed to have the same formula. In any case, I couldn't find any locally, but I did have some acrylic extender, so I tried this. The resulting "ink" was very thin. I started with Filch and Nez, and they came out much more grey than in the Painting Guide's illustrations. It was while working on the third figure, with a darker mix, that I had an epiphany—ironically, on Epiphany. I was not just undercoating the dark areas. I was painting shadow. I was painting light. I am basically Thomas Kinkade. This helped free me from the illustrations in the guide, which I had previously had difficulty deciphering. I intentionally did a slightly more aggressive inking than in the guide because I wanted to see how this affected the miniatures.
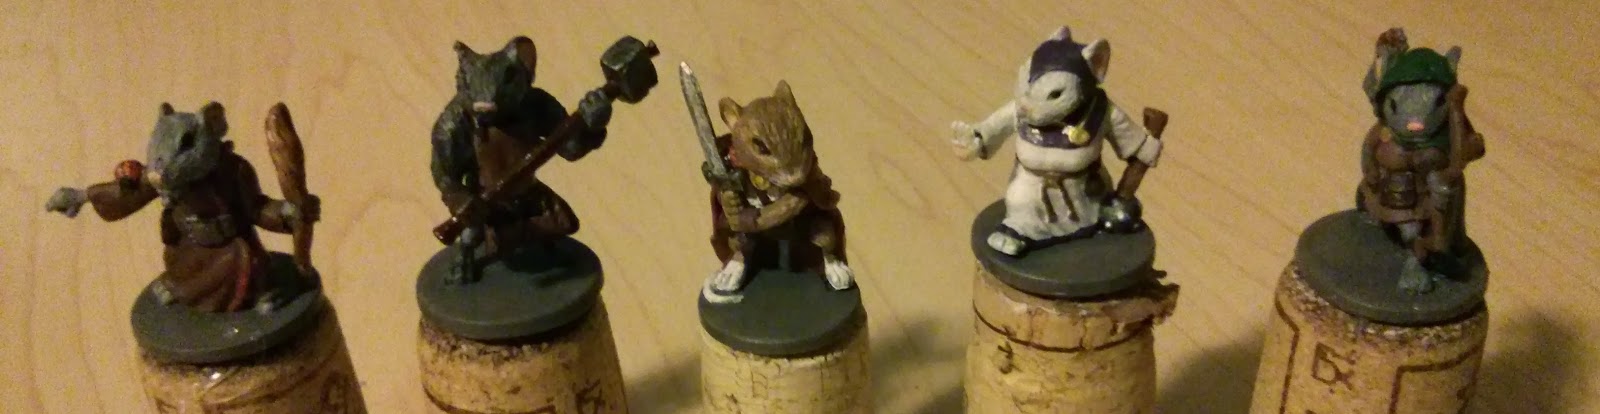
Filch was the first one I painted, the figure on the far left above. He is mostly cloak, and so this was my chance to try "lowlighting." I felt pretty good about understanding drybrushing as a highlighting technique—even if I am still not very good at it—but I had never done lowlighting before. The idea is to mix a darker version of the base color and use it to accent the deep or shadowed areas of the figure. Once again, I approached this with some trepidation, but I was thrilled with the result. Here is the finished Filch's back, showing off the lowlighting and very faint highlighting.
I completely painted and gloss-varnished Filch before moving on to another character. Afterwards, I realized this was inefficient. Several of the mice had recurring colors, such as brown leather, black eyes, pink ears, and dark metal details. I became a bit more pragmatic about my colors as I moved forward, looking at all the remaining figures as I decided what color to mix next.
Collin and Maginos provided good opportunities for me to practice lowlighting. I decided against a third layer of highlighting on these: I was not confident in my ability to predict the right shade, and I thought they looked fine as they were.
Some future archaeologist may study Maginos and wonder why there are so many different layers of color on his fur. Take a look at his illustration from the game:
When I first looked at the picture, I thought he was a light brown mouse with age-whitened fur. I mixed a grey-brown color and painted and inked him, and he looked all wrong, much too brown. I went back to Hawthorne's guide, and he had Maginos as decidedly grey. Given that my original color was a mess, I decided to completely re-do the fur, praying I would not clog any details and have to strip it. Fortunately, I was able to get a nice grey without having to resort to drastic measures.
Another good lesson came in Nez's apron. I painted it a flat beige-brown color, and it looked rather drab. I wasn't sure how to do any lowlighting on it, since there are no folds or wrinkles: it's just a big apron with two pockets in the front. I decided on a brown ink wash, and I think this worked great. All the dynamic shading you see in the picture is due to this simple wash on a rather nondescript portion of the model.
Here are five of the heroes, standing in a line, waiting to be varnished:
The last step was to put on a layer of gloss and a layer of Dullcote. The gloss was finished in the morning, and this reminds me, did you know that Dullcote has a really powerful solvent that will remove thin layers of paint beneath it if you're not careful? I did not know that. Filch had waited so long for his Dullcote, and I was pleased to finally be finishing him. At one point, though, I had to stop and say, "That color should not be there." In my carefree varnishing I pulled a bit of the cloak's ruddy brown right off. Fortunately, I was able to mix a matching color and patch it. It could have been much worse, and my lesson was learned: lighter coats, softer brush. I think once the weather gets warmer, I will get a can of Dullcote and try spraying again. I would at least like to compare the experience to brush-on.
Post touch-up, here are all the heroes, all together, all varnished, waiting to be removed from their corks.
I am really proud of the results. Holding a brush, mixing paints—even cleaning up—it was all very soothing. So much of what I do is intangible: you can't hold software, and you can't "see" the results of careful teaching. With painting, I can point to these miniatures and say happily, "I made these look pretty good."
That said, I know there is still a lot to learn. As I was painting, I thought about how everyone starts as a novice—everyone has to make something bad before they can make something good. I also had to think about how sometimes my students show me things that they are proud of, things that I think are still pretty flawed. When I was overwhelmed and staring uncomprehendingly at the wall of brushes at the hobby shop, perhaps that was what it's like when one of my students first opens Eclipse.
I would love for a few people to look at these miniatures and tell me they like them. I would also love for someone to tell me where to go. What are the biggest mistakes on these that maybe I cannot even see yet? What should I try next?
My next step will be to do some more reading on fundamental techniques. I have several board games with interesting miniatures, including some that get almost no table time. Perhaps The Legend of Drizzt will be next, since my son and I enjoy it, and it has quite a few miniatures. In the meantime, it will be fun to get back into playing Mice and Mystics. We have only played one full game since Christmas, since I've had the figures in various states of being painted since then!
A few words of gratitude are in order. Thanks to Jerry Hawthorne for providing the Painting Guide that gave me the confidence to move forward with something I had been putting off for years. Thanks to my college pal and gaming buddy, Jim, who helped me with some research and troubleshooting from hundreds of miles away. Finally, thanks to my wife, who has supported the resurrection of an old hobby.
Great work! They all look very good. In fact I've seen some expensive commissioned paint jobs not look that good.
ReplyDeleteI just started painting my Super Dungeon Explorer models and I also just bought a Warmachine Cyrx 25 point army.
I'm really waiting on my Robotech minis as I got in the Robotech RPG Tactics Kickstart.
Maybe I missed it, but I don't recall you mentioning what paints you settled on using. I have used Citadel, P3 and Vallejo model paints and Vallejo has become my easy favorite.
I also bought one of these ( http://www.amazon.com/gp/product/B0017R8WAA/ref=oh_details_o02_s00_i00?ie=UTF8&psc=1 ) ad I kept dropping and breaking the ceramic tiles. Ceramic tiles are the next best thing to a wet pallet as you can just add a drop of acrylic thinner and revive the paint.
The other thing I do is I prime my models with an airbrush. It's fast, can be done indoors (especially using acrylics that have no odor) and uses far less paint than brushing or spray can. The down side is that an airbrush and compressor are not cheap, but they will last you for your lie, and probably through at least your grandchildren's life if they are well maintained. If you have any questions about it feel free to drop me a line, I'd love to help you out not to mention catch up.
I will try to compile a list of the websites I use to get help/advice/tutorials/tips/tricks, painting is an art and there is always something new to learn or try.
Great to hear from you, Bryan!
DeleteI am using mostly Vallejo paints and their brush-on gloss varnish. They are from my initial trip to Hobby Lobby. Many of the colors there are clearly designed for people doing historic military models, and I couldn't find a nice flat green. At first I thought that the squeeze bottles were odd, but against my one Privateer pot of green, I realized I'd much rather squeeze onto my palette than dip into a pot.
My first few models, I used paper plates as a palette, but now I'm using a small white ceramic tile from an old bathroom project. It's working quite well, although it's a bit small. I honestly had not thought of using my extender to revive dried paint on the palette, but I will try that next time I paint!
From what I've read, it seems a lot of people like to prime with airbrushes, especially if doing large groups of figures. I've never held an airbrush before, so it's the kind of thing I'd want to try before I invested in. For now, I'm happy with the brush-on primer I got. One nice side-effect of it is that I had to get to know the model a bit better by priming it, discovering spots that were hard to reach.
Thanks for reading!
When I first started I bought a cheap pallet from hobby lobby that had several dimples in it for mixing paint. I realized quickly that these were no good as the paint dries out quickly, it's easier to mix on flat surfaces. With a tile the paint still dries out fairly quickly, but you can ALWAYS revive it, with a wet pallet the paint stays alive longer and you can revive it a few times, but after a while you can not.
DeleteHer are a few other things I do. I prime in a medium grey (60% same color used to white balance a camera). Most people use white or black but there is a trick that can only be done with grey. Once primed I decide where my lightsource will be and my shadow source(the polar opposite of the light source). From the point of the lightsource I will airbrush on white from about 6-8 inches and very lightly. This provides and automatic lightsource highlight. Then I do the same thing from the shadow source with black. you can also add in a few extra shadows and highlights at this point. This just automatically gives you light and shadow shading with a very smooth gradient. After that I will take several good photos from every angle. I lay these out into a single image an use a photo editor like Gimp to work out my color scheme before ever putting color on the model. This also allows you to familiarize with the model much like you do now with brush priming. The rest is just taking your time to get the pain on right and using the right washes for each color. I'm still not very good at getting smooth gradient highlights with dry brushing though.
If you ever decide you want to try out an airbrush I can let you borrow mine for a few days. I'm still pretty close to Muncie, about 20 minutes away, and My nephew is there on campus, not in the CS dept unfortunately.
Some good resources:
https://play.google.com/store/apps/details?id=com.hexxus.warpaint&hl=en Warpaint lets you match colors among different popular paint brands and lines.
This guy has a ton of great tutorials and tips and tricks. They are newest first, so you have to wade through them to get to the starting point. http://handcannononline.com/blog/category/hobby-content/painting/
This is aimed at military models but the technics still apply: http://www.scalemodelguide.com/category/painting-weathering/
One of the best tutorials on painting faces I've seen: http://www.youtube.com/watch?v=ODqCZEzfdl4
Thanks for the tips and the links! Do you have any photos of your guys? I'd love to see the result of the careful lighting considerations.
DeleteIt appears that white vs. grey vs. black primer is the emacs vs. vi of the painting world :)
Very interesting. I've done the Paint 'n' Take at Gencon 3 or 4 times now and have always enjoyed it. When I'm at home, though, I usually try to spend my free time working through my backlog of video games.. So I haven't yet decided if it's worth branching out into a new hobby. Between the brushes and paint (and primer and sealer and whatever other materials you bought) how much would you say you had to invest to get the materials to start? I'd be interested in seeing a general price along with a picture of your materials just to get an idea of what it'd take to start up.
ReplyDeleteI was able to use a few things from around the house, but a lot of the stuff I got specifically for the project. Although we had a bit of acrylic hobby paint, I decided to get some model paint after reading that a lot of people prefer it. I don't have any intention of doing competitive painting, but I figured I'd try these out anyway. (It also separates "Dad's paints" from "kids' paints", which seemed like it might be a good move.) I purchased three nice brushes, two round and one cats-tongue. I'm afraid I may have wrecked one of these by letting paint get up in the ferrule. (Also, "ferrule" is a thing.) I have a bunch of other brushes that we had laying around that I was able to use, including some #4 size ones that I used for a lot of the drybrushing and mixing, and some larger ones I used for priming and varnishing.
DeleteAll told, it was more than $50 but less than $100 for me to get started---or, as I like to put it, the cost of a two good designer board games. If you haven't already, take a look at Hawthorne's guide: he lays out five brushes and a handful of paints to get. For me, following his advice reduced both cognitive load and fear.
David, if you want to get started you dont have to spend a lot. You can actually goto HobbyLobby and get a cheap set of Acrylic paint for less than $20.00. It wont have all the colors you may want you you can mix paint. The draw back is you will probably need more thinner than usual and the paint will still dry thicker. The reason is the pigment for miniatures paint is much more finely ground. That said you can still buy some cheap minis to work on to get some of the techniques down before you decide to make an investment. You need a minimum of 3 brushes, a detail brush, a basing/priming brush and a dry brush.
Deletethis site tells you a bit about the brush materials: http://www.dndlead.com/Painting/Paintbrushes.htm
This site tells you how to test and care for a brush: http://miniature-art.tripod.com/paintbrushes/
http://en.wikipedia.org/wiki/Brush#Shapes Here you can see the shapes, for drybrushing flat/bright is a good choice; for priming/base coating/large areas the round shape is good; for detail you want the rigger shape.
To get started you can use crappy brushes ( http://shop.hobbylobby.com/products/artist-brush-set-724955/ ) but if you get into it you will want to get nice brushes. A god brush well taken care of should last you a few years, but will cost you $15-$30 per brush. A good brush allows you to work quicker and more easily recover from mistakes, however a crappy brush set forces you to be a better painter but it takes a lot more work and time for the same results.
Some thins you both should keep in mind.
1. If your not having fun your doing something wrong. I find painting helps with anxiety. I always have models on hand to paint and if Im getting stuck coding or having anxiety problems I take a break and paint for a lil bit and it helps and Im able to get back to work.
2. Keep notes! Nothing is worse than trying to remember what ratios you used on a model to match it later for other models. If you have notes you can get real close quicker, but using the exact ratios wont always give the same color as a 'drop' is not a precise measurement.
3. Wash every model before you glue and or paint. Wash your hands too. Grease, dirt and other things have a huge effect on painting something so small. Also zip-lock bags are your friend. no-pne paints a model all at once and covering a model with a zip-lock keeps dust off. I use cardboard rounds, like wrapping paper comes on, cut down to size so the zip-lock doesn't touch the model.
4. Do not touch the model. Once glued, your hands hould never com in contact with any part of a model. Most people attach them to corks or empty paint pots with poster tack.
5. This one is hard as acrylic is water based. It's a good idea to rinse the models before you top-coat/glaze, you don't want to glaze dust onto your model. You have to have a very light stream of water. Do not touch the model, and use a hair dryer on low about 10-18 inches from the model on low heat to dry it. Do not dab or rub it with anything to dry it, it WILL ruin the paint. If you don't feel 100% comfortable with this try it on a test model first or don't do it at all.
6. Acrylic is softer than you might think. Always glaze your finished models, I use 2-3 coats of glaze.
A few other things:
DeleteYou don't see it much any more as most all models are plastic/resin now, but with pewter you can IR bake the models after painting. This assumes you have an IR toaster oven. Don't use an element based toaster oven you need to have IR. Plastic and some resins will melt so don't bake them. This will cure the paint. The paint when it comes out will be softer than going in but as it cools it's much harder than it went in.
You can strip a pewter model and some plastic/resin. Ive had little and varying luck with plastics. My method is a 25/75 mixture of simple green and water. Let the models sit in this for 48 hours or more then use a medium bristle toothbrush to clean the paint off the model. Repeat as needed. Wash the model with dish soap and water after then rinse real well and let sit to dry or use the hair dryer method mentioned above.
I will get some pics of some of my stuff when I get my camera set back up.