You may recall that
my boys and I played our first game of Gaslands several days ago and really enjoyed it. Inspired by the fun game and the photographs in
the rulebook, we were excited to try making our own post-apocalyptic death race cars. We have a few Matchbox and Hot Wheels cars around the house, but these are played with pretty regularly by my younger boys, and so I was hesitant to take those. We stopped at two local thrift stores and found not a car in sight; there must be other players scouring the area. I put out a call on social media for unused cars, but all our ready sources are hundreds of miles away. The boys and I ended up just going to Meijer and buying some new ones. I was disappointed not to find anything to fit the lightweight cars category—buggies or motorcycles with sidecars—and the selection of pickup trucks was very thin. We found enough to get started, brought them home, and then started beating them up with files—an idea I got from
Universal Head's car modding tutorial.
I have been painting miniatures for about four and a half years now, but I do almost exclusively board game miniatures. As a result, I don't have much of a bits box, just a very few odds and ends. It seems some of the people who are into the hobby are drawing on existing collections and kit-bashing experience. In my case, a bit of online searching helped me find
FunBoardGames on Etsy, who sells 3D-printed accessories that are a good match for
Gaslands. I picked up a few items, knowing that the boys would likely go hog-wild, and FunBoardGames was kind enough to throw in an extra bag of bits that the guys could use.
That's enough of the backstory, let's get to the cars. I'll start with mine, and then I'll show you what my boys have worked on as well.
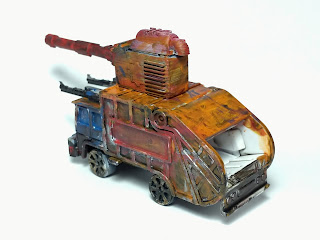
This is Spiky Poles, who is named after a helpful tutorial message in
Prince of Persia: Sands of Time that my wife and I have been laughing about for years: Avoid spiky poles. This is advice to live by. The car here was best pickup I could find, and I knew I wanted a turret-mounted heavy machine gun in the back. I ended up cutting up a plastic pipet and using the fluted part. It's a bit flimsy, but I hoped that with the addition of glue and paint that it would hold up.
I decided that I would show solidarity with my boys and, instead of working on the cars in the sanctuary of my office, I would work alongside them at the kitchen table, using their craft paints and ragged brushes. These craft paints behave very differently from my model paints, being very gloopy and hard to thin. They also take unbelievably long to dry. The downside is that painting was very slow, but the positive side was that I could mix a custom color, go have lunch, and come back to find the paints still wet. In fact, before we started painting, I splodged some black onto a newspaper, and after several hours of painting, it was still wet when we cleaned up. The paints' deciding not to dry inspired me to do some wet-blending, so I put flames on the hood of this truck. Then I looked over the rest of it and thought, "Should I add more flames?" I laughed, because
of course there should be more flames. I mixed a black and sepia ink wash to pinwash the recesses. For weathering, I mixed some rust colors
as I did for Stuffed Fables, stippled a light brown on the lower portions of the car for dirt, and used a sponge to stipple gunmetal onto some raised areas to give the illusion of chipped paint. I also mixed up black and brown ink with some matte medium and used this as a rough wash around the lower parts of the gun.
As usual, I used hot glue to affix the models to corks for ease of painting. What I didn't expect was how tightly the glue adhered to the underside of the cars. I accidentally broke the machine gun off its turret while futzing with the glue. Look again at the pictures and you can see the plastic turret showing through. I will touch it up later, but I leave it here as a reminder to myself to be more careful about such things in the future.
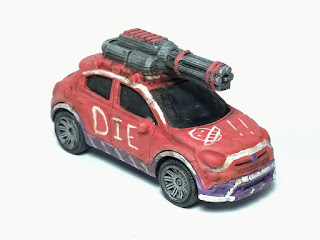

This is Guy Smiley, a little hatchback I found that, from the moment I saw it, I could picture a giant minigun mounted onto the luggage rack. I started with the red-orange color without much of a plan. The piece along the bottom was a different color in the original car, and I decided to do something bold and go with purple. This looked OK but still felt like it was missing something. Out of nowhere, the idea of zebra stripes came into my head, so I started freehanding the stripes along the purple parts of the car. Now I was getting somewhere. Just having stripes on the bottom didn't seem right, though, so I painted the lines along the front and along the doors and back, along with a "V" shape on the front. The sides still looked too plain, but now I was getting into a useful creative mode: I could start to picture a half-mad gearhead detailing his precious minigun hatchback. I added "Get Out!" to the driver's side and "Die" on the passenger side, and this made me think of a maniacal face with a grin that exceeds its head. About twenty years ago, a friend of mine made me a mix tape when I was feeling down, and she drew this funny little guys with smiles twice the size of their heads, and that has always struck me as a wonderful mix of cheerful and creepy. I replaced the hood's "V" with something more thematic, made the back look more like a creepy face, and added another smiley guy to the side. Nice. The lining and weathering on this car was done as with Spiky Poles.


Turns out that #1 Son and I had similar ideas for our teams. This is his car with a front-facing minigun, although he chose to side-mount it rather than top-mount. He is 11, and he has correspondingly more patience than his younger siblings. I think he did a fine job on this car. I mixed up a black-and-brown ink wash for him, which he decided to put over the whole thing, which gave it real dingy look. I suggested he go back and add highlights, but he decided he liked it the way it was.
When I realized I could put some inspirational writing on the side of Guy Smiley, I asked aloud, "What should I write on the side of this car?" #1 Son answered, "Loser." Perfect, I thought! Then he admitted that it's what he had been thinking of writing on his. Well, I couldn't use that any more, but I think he did a good job with it. It's a little hard to see, both because of the wash and the angle of the picture, but he actually wrote it in two colors on the passenger side. The two colors looks great, and I thought about copying that for Guy Smiley, but I decided to stick with the single detail color to keep a simpler color scheme.


Here is #1 Son's truck-with-ram-and-turret-mounted-machine-gun, which again was developed totally independent of my own. As we were planning out our colors, he referenced a color wheel and decided intentionally to take complementary colors for high contrast. This kid, he'll turn into something. The base of his turret is another piece of that pipet that I cut up.
Looking over his cars now, I wonder if he would have enjoyed adding some weathering. I did my dirt and chip effects after the guys had gone to bed. Next time, I'll show him more about how I did that, in case he wants to try it himself.


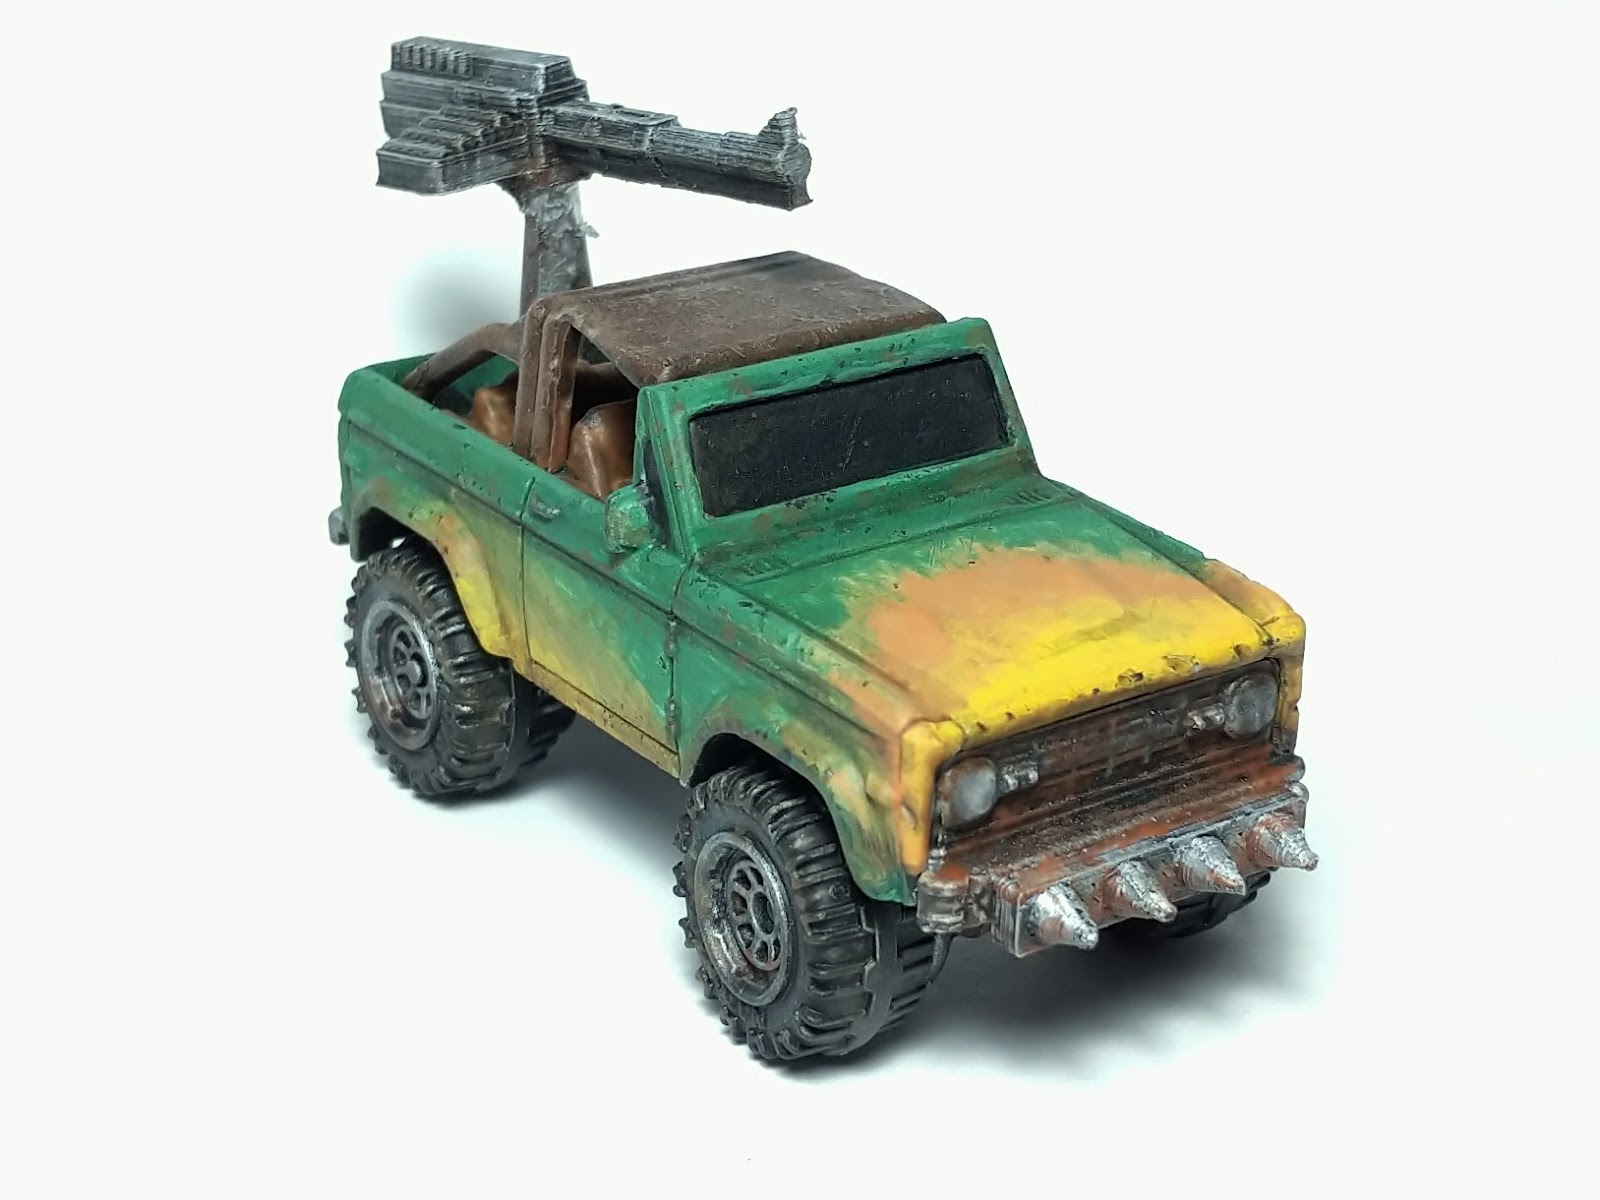
#2 Son is eight and worked on these two cars. We developed his team before acquiring cars, and the team includes a buggy and a car. Unfortunately, we found nothing like a buggy, and he really wanted to use this humvee as a "car" and not a "truck". It gives a little bit of dissonance in the game, and a few times we forgot that the jeep was a different weight for purposes of smash attacks. That's just part of playing with younger guys I think, though. I think he did a pretty good job here. We used an ink wash to got into the recesses, and a bit to my surprise, he took some time to go back and add some highlights to a few areas. He was inspired by the lettering on our vehicles, and so he wrote "race" on the hood of the jeep. (And yes, that jeep has a side-mounted machine gun.)
I remember when I was a little boy, I had an orange muscle car, and I painted a confederate battle flag on the top of it to make it into
the General Lee. I can picture it in my mind's eye. I knew it was not a perfectly rendered flag, and yet I was so proud of it, because it was the General Lee. It was almost like an icon or a signifier rather than the thing itself. I have not asked my younger boys about any of their artistic decisions, about if elements are supposed to be something else I don't recognize, or if the chaos of the brush and the paint is enough.

There is a sense in which this is the coolest of the cars. #3 Son is five years old and, for as long as he can remember, has loved to wave to the garbage man. Turns out, we have a very cool garbage man, who will always honk the horn and will regularly come out and talk to the boys. This morning, in fact, he got out of his truck and joined them in drawing with sidewalk chalk for a minute or two. Many months ago, he gave the boys little Muncie Sanitary District trucks. When I explained to the younger two boys that they could each pick a car from their collection to mod, #3 Son went right to his trusty garbage truck.
I dumped out the bags of weapons, and he picked out a 120mm gun and two machine guns for the top, a ram, and two more machine guns for the sides. The way he wanted them all attached was tricky to do all at once, but I was able to get the guns you see here attached in between helping the other boys. He ended up being content with this set of weapons and went on to paint it.
The truck started out in bright and bold colors, but keep in mind that these craft paints just won't dry. As he added more colors, especially as he started adding some black, everything ran together into kind of a mess of brown. I encouraged him to let it dry, then come back and "highlight" it. He was unsure at first, but he came back and added more bright colors on top of the muddy browns, and now it has a lot more life. Along the way, I also talked to him about ensuring that he painted into all the recesses so that we could add a wash to bring out some of the details. He was over the moon at this idea, and he did well for a five-year-old. He even added another layer of highlights after the wash.


The Youngest Son is only three, but of course he wanted in on the action. He picked some kind of emergency vehicle and was content to put the largest possible gun on top of it. You can't go wrong with being three, having trucks, paints, and giant guns, and sitting with your dad and brothers at the crafting table.
The two younger boys are too young for
Gaslands, and in fact, the game may be a bit too long for #2 Son as well, who is at the edge of the recommended age listed
on Board Game Geek. However, I also recently bought the rulebook for
JUNK'D, a simpler yet similarly-themed game that is designed to support modded cars. We played a whole-family game using the Print-and-Play components on Tuesday, and the little guys did OK with a bit of coaching.
Yesterday, the two older boys and I got our cars to the table for our first
Gaslands death race.
Here they are, lined up at the starting position on the dining room table. I won the roll for pole position, and so Guy Smiley was lined up in position to shoot straight through a sort of obstacle funnel that we had on the table.
Despite the poor quality of the photo, you can see the chaos after the first full round. Guy Smiley has already made it through the first gate, while most everyone else is jammed up. A lot of those cars have rams, so there was a lot of "take that!" which worked to the advantage of Guy Smiley. He took a few shots from #1 Son's cars, but he was able to turn the corner and hit high gear to escape to victory. We had a lot of fun, and the boys are eager to play again.
The boys and I had picked up a few extra cars, and I think they're excited to build more teams and mod more cars. With my
Meaningful Play paper accepted, a grant proposal submitted, and my
three Fall courses revised and in place, I'll be looking forward to more crafting and racing.
Thanks for reading!


Love the detailed table-side commentary. I feel like I was there watching and can sense the fun and satisfaction. Thanks for taking the time to share the experience. I’ve been dabbling in the papercraft equivalent: distress inking, with layers and washes. It will be fun to explore together. In the meantime, I’ll keep an eye open for Hot Wheels.
ReplyDeleteGreat story, and nice work on the cars. But most of all, sounds like you're being a great dad. Your kids we'll always remember it. Keep up the good work.
ReplyDelete