Showing posts with label crafting. Show all posts

Thursday, October 18, 2018

Gaslands crafting, Round 2: Cars and Templates

We had so much fun making our first round of Gaslands cars, we decided to do another round—and this time, even my wife joined in! A friend of hers responded to our request for spare Matchbox and Hot Wheels cars, and she generously gave us a huge bin of them. As before, almost all the modifications are based on 3D-printed weapons and bits from Fun Board Games.

We'll start with my cars, which I can tell you a little about, and then we'll run through some of the other family-crafted cars.

I started with a pair of cars intended to be used as a Miyazaki team, using the sample team from page 38 of the rulebook. This team is noticeably different from the rest in that it has no shooting weapons: all the cans are spent on driver perks and performance cars except for one dropping weapon. I wanted a clear team color scheme for this pair of cars, and I ended up going with simple racing stripes rather than more fanciful embellishments. The cars were originally going to be called "One-Stripe" and "Two-Stripe", but I decided to go with "Ichi" and "Ni" instead. (Also, now that I upload the photos, I see they are a bit warm. I don't think I want to re-shoot all the cars, so I'll just leave them as-is. It's only repainted toy cars, after all.)


Honestly, I'm not happy with them. While painting them, I was eager to see what I could do with the stripes, and so I did not pay enough attention to highlighting the blue. I also wanted them to look sleek and new, so I did not do any weathering on them. The result is just bland. This is a shame, since it turns out they are really fun to play as a team. The stripes make it hard to go back and touch up the blue, so I would have to really repaint the whole body to revise it.

My other two cars are not really designed to go together; they are just a pair that explore different things I wanted to try. I've read about modelers and miniature kit-bashers talk about using styrene to make custom pieces, and so I finally bought myself some styrene sheets and tubes. I built the mortar on this truck by cutting up two machine guns from my 3D-printed set, using the back of one as the back of the mortar and the front of the two others as struts. The barrel is a styrene tube with accents created from—you guessed it—a slightly larger styrene tube.

I didn't have much of an idea of how to paint it, so I figured I'd try camouflage. The tone isn't quite right, but I like to think the gearhead who was painting it didn't know any better anyway.


This last car of mine was just having some fun with styrene blade accents. The spikes on the wheels were from the set I bought, but the hood blades were hand-crafted. I also tricked out the exhaust a bit, after seeing how my son (below) had done his. All of our cars are much more tame than some of the post-apocalyptic stuff that hobbyists produce; it might be fun on my next set to do lots of armor plating and mesh, but for now, I'm happy making them look good and getting them to the table.


My wife decided to join in this round of car creation. Here are hers:


She was cautious about shades and weathering, but I think she did a fine job. The complementary orange and blue works really well on the white car in particular. Funny story: I saw a work-in-progress of the bottom car and told her I was excited to see someone do a white car. Turns out, it was just primer and she was planning to paint it a different color. My wife has only painted a handful of miniatures with me, such as Valeros for our Pathfinder Adventure Card Game campaign, but I think she has areal talent for it. Maybe we will do more couples' painting someday.

Next up are the cars by #1 Son (11), who had developed a Mishkin team and wanted them to have a uniform look.


In our first painting session, he had done the cars and the windshields in nigh-identical blacks, and I don't remember now if I commented on that or not. I think he did a great job bringing out the windshields, making them appear a different material from the rest of the car. He did ask me about lightning as he was getting into it, and I suggested a layer of white first, so that the blue would pop. I think he did a nice job with this, layering in multiple blues. Also, the edge highlighting on his cars is honestly better than my blue team.

The other funny story here is that I saw which cars he was working on, and he referred to them as "performance cars", which are a specific designation in Gaslands. I laughed and pointed out that these Matchbox cars were not sports cars, they were just sedans. He seemed to not really know the difference, but I thought about it, and it's not like we talk about cars. The rulebook doesn't have pictures. How else would someone infer what the rules were talking about? Anyway, I am not sure if it was in response to my comment or not, but he went in and added the extra exhaust pipes, making them out of nested styrene tubes similar to my mortar. I am pretty sure his idea for this technique came from my working on the mortar, but I ended up liking his exhaust pipes so much that I copied it on my orange car above (sans nested tubes).

Now we get to #2 Son (8), who was making a Slime team. He hasn't really read the rules, but he liked the idea of a team called Slime that focuses on causing chaos. His team is called "The Exploding Sharks," and here they are:


Notice the shark-tooth motif on the hoods. He was intentionally going for bold, crazy colors here. I do wonder what his cars might look like if he was trying to do a serious paint job. Sounds to me like we need to carve out more family painting time.

#3 Son (5) got involved as well, and I was really surprised that his cars were much less gun-encrusted than the first round.


It's kind of hard to look at them and make sense out of what he was trying to do, but it's all very deliberate. Indeed, it's interesting to watch him and his younger brother work with such attention and focus, yet not clearly without any plan. It is as if all the focus is going into an understanding of the materials as they are, rather than having any concern of the outcome-as-desired. Maybe I'm making that up or projecting, I don't know, but it makes me curious about children's art education philosophy.

Finally, #4 son (3) was happy to work with us to build and paint some cars as well.


Personally, I love the machine gun going sideways off the bus. We're putting machine guns on cars, so why not?

Here's a few pieces of terrain that I put together as well.

The top two are simply large templates cut from black craft foam and grey felt for oil slicks and smoke, respectively. The other two are mines and caltrops and required a bit more work. My wife picked up several small containers of beets at the grocery store, and the tops had a section of plain, clear plastic that looked just right for Gaslands' small template. The mines are buttons whose holes I filled with Milliput and then painted to look dirty and metallic. If you look closely, you can see that there's still some unfortunate putty texture to the top, and this was after I added several layers of gloss varnish to try to smooth out the surface. Good enough for tabletop work, but not as nice as I had hoped for.

The caltrops were the most labor intensive, but also the most fun. I took unused staples and clipped them in half with my wire cutters. This leaves two nice L-shaped bits, and so I glued these together with Goop. That was tedious, because I had to hold these tiny little asterisks still while the glue cured, but it was a good excuse to listen to a podcast. Once that was done, I decided that I wanted them to have a painted look rather than a raw metal look, so I primed them black and painted them a gunmetal color, with a wash to add grime and shade. Once that was done, my plan was to glue them to my small beet-top templates, but holding them next to the cars, I thought the scale looked wrong. I went back with my wire cutters and clipped off about a quarter of each leg. The resulting caltrops are what you see here, superglued to the templates.

The cars were actually completed sometime in early September or late August, judging from the dates on my photos. I started writing this post weeks ago, but despite my claim to the contrary, I was thinking about reshooting all the cars under better lighting condition. This means that the cars have been all over my painting desk since, and the semester has been beating me down, so I haven't done any painting since then. I have some pieces primed that I'm just not excited about, but I happened to receive a shipment earlier this week that is giving me some excitement to paint; watch this blog for future details.

My Miyazaki team has faced down my sons' Mishkin and Slime teams in two rounds of a planned three-round escalating tournament. So far, Mishkin has won each time, so the scores are 10-6-2. Essentially, Mishkin's tournament victory is a fait accompli, but we're still having fun. The escalating part of the season—where you add ten cans to each team between games—is the least interesting part to me, but I like the tournament format with random scenario selection. Turns out Mishkin can really crank out the points in Saturday Night Live.

Thanks for reading. As I said, the semester has been wearing me down, but I think we're transitioning into a quieter period, with all my conferences behind me and students switching into project mode. I have a research protocol that a colleague and I are working on that still needs to be submitted to IRB, and there's still plenty of work to do on our curriculum. I also just found out that I'll be teaching a new course next semester: our graduate-level introduction to software engineering. It's not what I would have chosen for myself, but I'll do my best to make it good. Expect a tilt toward agility.

Thursday, August 2, 2018

Family Crafting with Gaslands

You may recall that my boys and I played our first game of Gaslands several days ago and really enjoyed it. Inspired by the fun game and the photographs in the rulebook, we were excited to try making our own post-apocalyptic death race cars. We have a few Matchbox and Hot Wheels cars around the house, but these are played with pretty regularly by my younger boys, and so I was hesitant to take those. We stopped at two local thrift stores and found not a car in sight; there must be other players scouring the area. I put out a call on social media for unused cars, but all our ready sources are hundreds of miles away. The boys and I ended up just going to Meijer and buying some new ones. I was disappointed not to find anything to fit the lightweight cars category—buggies or motorcycles with sidecars—and the selection of pickup trucks was very thin. We found enough to get started, brought them home, and then started beating them up with files—an idea I got from Universal Head's car modding tutorial.

I have been painting miniatures for about four and a half years now, but I do almost exclusively board game miniatures. As a result, I don't have much of a bits box, just a very few odds and ends. It seems some of the people who are into the hobby are drawing on existing collections and kit-bashing experience. In my case, a bit of online searching helped me find FunBoardGames on Etsy, who sells 3D-printed accessories that are a good match for Gaslands. I picked up a few items, knowing that the boys would likely go hog-wild, and FunBoardGames was kind enough to throw in an extra bag of bits that the guys could use.

That's enough of the backstory, let's get to the cars. I'll start with mine, and then I'll show you what my boys have worked on as well.


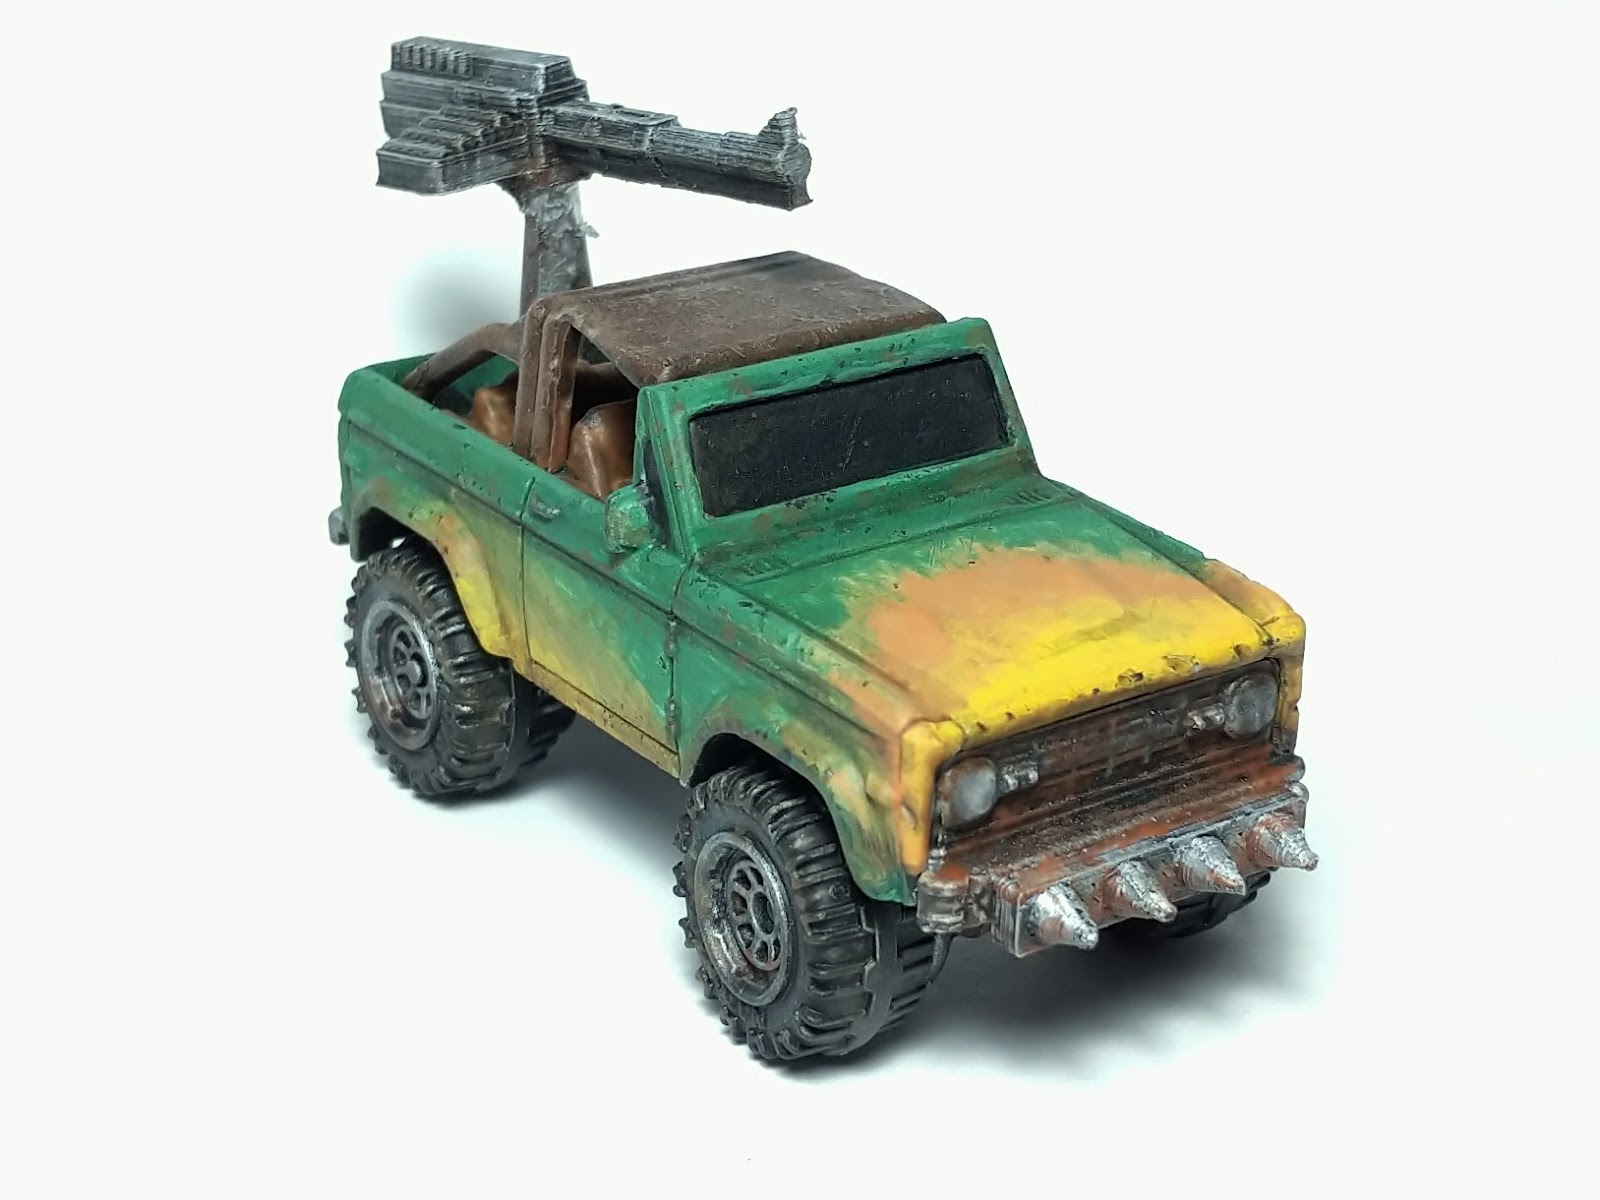
This is Spiky Poles, who is named after a helpful tutorial message in Prince of Persia: Sands of Time that my wife and I have been laughing about for years: Avoid spiky poles. This is advice to live by. The car here was best pickup I could find, and I knew I wanted a turret-mounted heavy machine gun in the back. I ended up cutting up a plastic pipet and using the fluted part. It's a bit flimsy, but I hoped that with the addition of glue and paint that it would hold up.

I decided that I would show solidarity with my boys and, instead of working on the cars in the sanctuary of my office, I would work alongside them at the kitchen table, using their craft paints and ragged brushes. These craft paints behave very differently from my model paints, being very gloopy and hard to thin. They also take unbelievably long to dry. The downside is that painting was very slow, but the positive side was that I could mix a custom color, go have lunch, and come back to find the paints still wet. In fact, before we started painting, I splodged some black onto a newspaper, and after several hours of painting, it was still wet when we cleaned up. The paints' deciding not to dry inspired me to do some wet-blending, so I put flames on the hood of this truck. Then I looked over the rest of it and thought, "Should I add more flames?" I laughed, because of course there should be more flames. I mixed a black and sepia ink wash to pinwash the recesses. For weathering, I mixed some rust colors as I did for Stuffed Fables, stippled a light brown on the lower portions of the car for dirt, and used a sponge to stipple gunmetal onto some raised areas to give the illusion of chipped paint. I also mixed up black and brown ink with some matte medium and used this as a rough wash around the lower parts of the gun.

As usual, I used hot glue to affix the models to corks for ease of painting. What I didn't expect was how tightly the glue adhered to the underside of the cars. I accidentally broke the machine gun off its turret while futzing with the glue. Look again at the pictures and you can see the plastic turret showing through. I will touch it up later, but I leave it here as a reminder to myself to be more careful about such things in the future.


This is Guy Smiley, a little hatchback I found that, from the moment I saw it, I could picture a giant minigun mounted onto the luggage rack. I started with the red-orange color without much of a plan. The piece along the bottom was a different color in the original car, and I decided to do something bold and go with purple. This looked OK but still felt like it was missing something. Out of nowhere, the idea of zebra stripes came into my head, so I started freehanding the stripes along the purple parts of the car. Now I was getting somewhere. Just having stripes on the bottom didn't seem right, though, so I painted the lines along the front and along the doors and back, along with a "V" shape on the front. The sides still looked too plain, but now I was getting into a useful creative mode: I could start to picture a half-mad gearhead detailing his precious minigun hatchback. I added "Get Out!" to the driver's side and "Die" on the passenger side, and this made me think of a maniacal face with a grin that exceeds its head. About twenty years ago, a friend of mine made me a mix tape when I was feeling down, and she drew this funny little guys with smiles twice the size of their heads, and that has always struck me as a wonderful mix of cheerful and creepy. I replaced the hood's "V" with something more thematic, made the back look more like a creepy face, and added another smiley guy to the side. Nice. The lining and weathering on this car was done as with Spiky Poles.


Turns out that #1 Son and I had similar ideas for our teams. This is his car with a front-facing minigun, although he chose to side-mount it rather than top-mount. He is 11, and he has correspondingly more patience than his younger siblings. I think he did a fine job on this car. I mixed up a black-and-brown ink wash for him, which he decided to put over the whole thing, which gave it real dingy look. I suggested he go back and add highlights, but he decided he liked it the way it was.

When I realized I could put some inspirational writing on the side of Guy Smiley, I asked aloud, "What should I write on the side of this car?" #1 Son answered, "Loser." Perfect, I thought! Then he admitted that it's what he had been thinking of writing on his. Well, I couldn't use that any more, but I think he did a good job with it. It's a little hard to see, both because of the wash and the angle of the picture, but he actually wrote it in two colors on the passenger side. The two colors looks great, and I thought about copying that for Guy Smiley, but I decided to stick with the single detail color to keep a simpler color scheme.


Here is #1 Son's truck-with-ram-and-turret-mounted-machine-gun, which again was developed totally independent of my own. As we were planning out our colors, he referenced a color wheel and decided intentionally to take complementary colors for high contrast. This kid, he'll turn into something. The base of his turret is another piece of that pipet that I cut up.

Looking over his cars now, I wonder if he would have enjoyed adding some weathering. I did my dirt and chip effects after the guys had gone to bed. Next time, I'll show him more about how I did that, in case he wants to try it himself.


#2 Son is eight and worked on these two cars. We developed his team before acquiring cars, and the team includes a buggy and a car. Unfortunately, we found nothing like a buggy, and he really wanted to use this humvee as a "car" and not a "truck". It gives a little bit of dissonance in the game, and a few times we forgot that the jeep was a different weight for purposes of smash attacks. That's just part of playing with younger guys I think, though. I think he did a pretty good job here. We used an ink wash to got into the recesses, and a bit to my surprise, he took some time to go back and add some highlights to a few areas. He was inspired by the lettering on our vehicles, and so he wrote "race" on the hood of the jeep. (And yes, that jeep has a side-mounted machine gun.)

I remember when I was a little boy, I had an orange muscle car, and I painted a confederate battle flag on the top of it to make it into the General Lee. I can picture it in my mind's eye. I knew it was not a perfectly rendered flag, and yet I was so proud of it, because it was the General Lee. It was almost like an icon or a signifier rather than the thing itself. I have not asked my younger boys about any of their artistic decisions, about if elements are supposed to be something else I don't recognize, or if the chaos of the brush and the paint is enough.


There is a sense in which this is the coolest of the cars. #3 Son is five years old and, for as long as he can remember, has loved to wave to the garbage man. Turns out, we have a very cool garbage man, who will always honk the horn and will regularly come out and talk to the boys. This morning, in fact, he got out of his truck and joined them in drawing with sidewalk chalk for a minute or two. Many months ago, he gave the boys little Muncie Sanitary District trucks. When I explained to the younger two boys that they could each pick a car from their collection to mod, #3 Son went right to his trusty garbage truck.

I dumped out the bags of weapons, and he picked out a 120mm gun and two machine guns for the top, a ram, and two more machine guns for the sides. The way he wanted them all attached was tricky to do all at once, but I was able to get the guns you see here attached in between helping the other boys. He ended up being content with this set of weapons and went on to paint it.

The truck started out in bright and bold colors, but keep in mind that these craft paints just won't dry. As he added more colors, especially as he started adding some black, everything ran together into kind of a mess of brown. I encouraged him to let it dry, then come back and "highlight" it. He was unsure at first, but he came back and added more bright colors on top of the muddy browns, and now it has a lot more life. Along the way, I also talked to him about ensuring that he painted into all the recesses so that we could add a wash to bring out some of the details. He was over the moon at this idea, and he did well for a five-year-old. He even added another layer of highlights after the wash.


The Youngest Son is only three, but of course he wanted in on the action. He picked some kind of emergency vehicle and was content to put the largest possible gun on top of it. You can't go wrong with being three, having trucks, paints, and giant guns, and sitting with your dad and brothers at the crafting table.

The two younger boys are too young for Gaslands, and in fact, the game may be a bit too long for #2 Son as well, who is at the edge of the recommended age listed on Board Game Geek. However, I also recently bought the rulebook for JUNK'D, a simpler yet similarly-themed game that is designed to support modded cars. We played a whole-family game using the Print-and-Play components on Tuesday, and the little guys did OK with a bit of coaching.

Yesterday, the two older boys and I got our cars to the table for our first Gaslands death race.

Here they are, lined up at the starting position on the dining room table. I won the roll for pole position, and so Guy Smiley was lined up in position to shoot straight through a sort of obstacle funnel that we had on the table.
Despite the poor quality of the photo, you can see the chaos after the first full round. Guy Smiley has already made it through the first gate, while most everyone else is jammed up. A lot of those cars have rams, so there was a lot of "take that!" which worked to the advantage of Guy Smiley. He took a few shots from #1 Son's cars, but he was able to turn the corner and hit high gear to escape to victory. We had a lot of fun, and the boys are eager to play again.

The boys and I had picked up a few extra cars, and I think they're excited to build more teams and mod more cars. With my Meaningful Play paper accepted, a grant proposal submitted, and my three Fall courses revised and in place, I'll be looking forward to more crafting and racing.

Thanks for reading!

Monday, September 5, 2016

Playing Frostgrave and Family Terrain Crafting

I don't remember where I first heard about Frostgrave, but I fell in love with the idea of a fantasy-themed skirmish-level wargame that I could play with the miniatures I already have. I have been painting for almost three years now, and so I've built up quite a collection of good-looking miniatures who never see the table. I ordered the rulebook over the summer, and my eldest son and I started a campaign. I created an Enchanter, using my Ezren miniature that I painted for the Pathfinder Adventure Card Game. I expected my son to go with something like an Elementalist or, given his penchant for buying undead creatures, maybe a Necromancer. He actually went with a Witch, I think in part because he had a nice Feiya miniature he painted up a while ago. To play the first game of our campaign, we simply raided the box-o'-blocks and made sure not to have long lines of sight.

First game. Watch for the Statue of the Mayor in the middle of town---the orange conical shape with red tip.
Ezren bravely hides behind a wall
We had a fantastic time, each of us securing three treasures, building strongholds, and leveling-up our wizards.

For our second game, we added some height-variation. The changes in elevation added a lot to our enjoyment. I came away with four treasures to his two, thanks to the amazing enchanter spell, telekinesis.
We actually got part of the climbing rules wrong, but we still had fun jumping and running around the multiple levels. Also, a good view of the Statue of the Mayor in the center of town.
A frost giant, played here by an Ettin, appeared right in the middle of my reserves. The archer and war dog are about to take one for the team.
Our board designs got a bit more sophisticated as we moved to our third game, and this was also where we started using scenarios from the book. This is the Worm Hunt, where there's a chance each turn of a giant Herbertesque worm emerging from the ground and attacking the treasure hunters. I feel kind of bad about this one, since a worm came up right around my son's guys, and in an amazing twist of luck, he got it down to one health. He sent in his war dog to finish it off, but missed (and the dog was eaten). I won initiative and was able to pick off the worm's one health for the XP reward. We both agreed it was lame but also that there was no good reason not to do it. He is very gracious, and I got away with four to his two again, plus two giant worm kills.

More of a ruined city, especially in the front and center areas of the right-hand side.

The view from the famous Statue of the Mayor's Dog
Our fourth game involved a scenario with a magical well in the middle of town. We envisioned it as a market center, with an old grand arch and ruins around it, including a collapsed temple and stores. My wife walked through the room and commented that this was our "best-looking" table yet. I agree!

The paper strips are Fog markers. We both have the spell and end up with a lot of fog on the board.
Around the time we started playing Frostgrave and realized we both loved it, I started looking for cheap terrain or tutorials on how to build the same. The search for the first is easy: there really isn't any "cheap" terrain. We looked at some options at the exhibit hall of GenCon, but nothing really caught my eye. I turned to YouTube and ended up watching several videos by Mel the Terrain Tutor, which were really helpful. In particular, his series about making cheap terrain using foamcore is excellent; I look forward to trying these techniques sometime, although some specific elements of his design are more modern-urban than the kind of fantasy-urban we're going for in Frostgrave. I came across Luke's APS purely by chance, and I find his cheerful demeanor infectious, and he pays special attention to making things nicely but cheaply. However, It was watching Mel's videos where I first heard about DMG and, more importantly for our purposes, DM Scotty. 

DM Scotty has a two-part series (part 1, part 2) on how to build cheap ruins, mostly from ruins and hot glue. Oh my, does this guy have a lot of uses for hot glue. I've used the stuff to hold my miniatures to corks for painting, but that's been the extent of my adult experience with hot glue, ... at least until a few days ago. My son and I watched his videos and decided that we would give it a shot. Family crafting time!

In the videos, DM Scotty uses two-wall corrugated board for the main body of the ruins. We only had single-wall, so we started by just gluing cardboard flats together using some white glue. I took a tip from Mel's video about cheap basing materials and turned the corrugations orthogonal to each other, hoping that this would give a solid body. Then, we set to cutting out our shapes and hitting the hot glue. For most of these steps, I went first, and my son gave it a shot next, although he would frequently remember things from the video that I didn't. In both pieces, I think we were both a bit overzealous with the vertical glue effect, reflecting our exaggerated recollection of the video: DM Scotty's is much nicer, and so shall our next pieces. We also didn't remember his trick of adding more cardboard verticals to appear like support beams on the walls. Again, a note for next time.

Mine's on the left, with the doorway cut out. It also has a small second level, which you cannot really see here.
After a trip to the store to pick up some all-purpose sand, we added texture to the pieces using white glue and sand. We also used play sand to fill in the corrugations on the side, which does indeed make the finished project look more like a ruins than like a corrugated cardboard!


I took these outside and painted them black using some black primer spray paint I have for miniatures. The weather here in Indiana is not always good for outside spraying, but we hit this at just the right time.

Next up, we used some sponge-brushes to stipple on our medium grey and light grey highlights. I dabbed much of the paint off of mine, leaving a much darker color. My son had a lot of paint in the sponge, and so even stippling, he got a lot more paint on the walls. He also took some time to paint on some cracks, but I decided to skip that step, in part because my overzealous hotgluing didn't leave a lot of central surface area.


We added some burnt grass flock that I had from painting miniatures, something I often use with my grey-rubble bases as a subtle accent. My wife pulled out some assorted mosses that she acquired for an amazing ent costume she made my second son for Halloween last year, and we used these as the finishing touches. 

Here are the final results!


While we both agree that there are things we would do differently, we are also very proud of our first terrain pieces. I'm sure we'll make time in the coming days to use these in a Frostgrave game.

I am reminded of what I wrote about when I first returned to the miniature painting hobby. When I was young and playing a lot of D&D, we didn't have a lot of resources to connect with a community of players. Now, it's amazing what you can learn from a combination of YouTube, reflective practice, and whatever your wife pulls out of the closet. I am grateful for guys like Mel, DMG, DM Scotty, and Luke for what they bring to amateurs like us—a family that enjoys playing and crafting together.

Cheers!