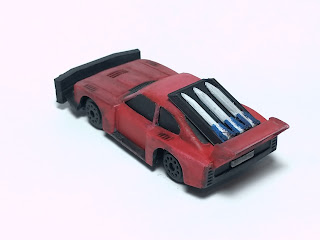
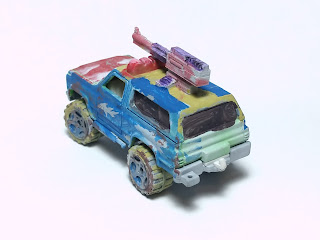
We'll start with my cars, which I can tell you a little about, and then we'll run through some of the other family-crafted cars.
I started with a pair of cars intended to be used as a Miyazaki team, using the sample team from page 38 of the rulebook. This team is noticeably different from the rest in that it has no shooting weapons: all the cans are spent on driver perks and performance cars except for one dropping weapon. I wanted a clear team color scheme for this pair of cars, and I ended up going with simple racing stripes rather than more fanciful embellishments. The cars were originally going to be called "One-Stripe" and "Two-Stripe", but I decided to go with "Ichi" and "Ni" instead. (Also, now that I upload the photos, I see they are a bit warm. I don't think I want to re-shoot all the cars, so I'll just leave them as-is. It's only repainted toy cars, after all.)
Honestly, I'm not happy with them. While painting them, I was eager to see what I could do with the stripes, and so I did not pay enough attention to highlighting the blue. I also wanted them to look sleek and new, so I did not do any weathering on them. The result is just bland. This is a shame, since it turns out they are really fun to play as a team. The stripes make it hard to go back and touch up the blue, so I would have to really repaint the whole body to revise it.
My other two cars are not really designed to go together; they are just a pair that explore different things I wanted to try. I've read about modelers and miniature kit-bashers talk about using styrene to make custom pieces, and so I finally bought myself some styrene sheets and tubes. I built the mortar on this truck by cutting up two machine guns from my 3D-printed set, using the back of one as the back of the mortar and the front of the two others as struts. The barrel is a styrene tube with accents created from—you guessed it—a slightly larger styrene tube.
I didn't have much of an idea of how to paint it, so I figured I'd try camouflage. The tone isn't quite right, but I like to think the gearhead who was painting it didn't know any better anyway.
This last car of mine was just having some fun with styrene blade accents. The spikes on the wheels were from the set I bought, but the hood blades were hand-crafted. I also tricked out the exhaust a bit, after seeing how my son (below) had done his. All of our cars are much more tame than some of the post-apocalyptic stuff that hobbyists produce; it might be fun on my next set to do lots of armor plating and mesh, but for now, I'm happy making them look good and getting them to the table.
My wife decided to join in this round of car creation. Here are hers:
She was cautious about shades and weathering, but I think she did a fine job. The complementary orange and blue works really well on the white car in particular. Funny story: I saw a work-in-progress of the bottom car and told her I was excited to see someone do a white car. Turns out, it was just primer and she was planning to paint it a different color. My wife has only painted a handful of miniatures with me, such as Valeros for our Pathfinder Adventure Card Game campaign, but I think she has areal talent for it. Maybe we will do more couples' painting someday.
Next up are the cars by #1 Son (11), who had developed a Mishkin team and wanted them to have a uniform look.
In our first painting session, he had done the cars and the windshields in nigh-identical blacks, and I don't remember now if I commented on that or not. I think he did a great job bringing out the windshields, making them appear a different material from the rest of the car. He did ask me about lightning as he was getting into it, and I suggested a layer of white first, so that the blue would pop. I think he did a nice job with this, layering in multiple blues. Also, the edge highlighting on his cars is honestly better than my blue team.
The other funny story here is that I saw which cars he was working on, and he referred to them as "performance cars", which are a specific designation in Gaslands. I laughed and pointed out that these Matchbox cars were not sports cars, they were just sedans. He seemed to not really know the difference, but I thought about it, and it's not like we talk about cars. The rulebook doesn't have pictures. How else would someone infer what the rules were talking about? Anyway, I am not sure if it was in response to my comment or not, but he went in and added the extra exhaust pipes, making them out of nested styrene tubes similar to my mortar. I am pretty sure his idea for this technique came from my working on the mortar, but I ended up liking his exhaust pipes so much that I copied it on my orange car above (sans nested tubes).
Now we get to #2 Son (8), who was making a Slime team. He hasn't really read the rules, but he liked the idea of a team called Slime that focuses on causing chaos. His team is called "The Exploding Sharks," and here they are:
Notice the shark-tooth motif on the hoods. He was intentionally going for bold, crazy colors here. I do wonder what his cars might look like if he was trying to do a serious paint job. Sounds to me like we need to carve out more family painting time.
#3 Son (5) got involved as well, and I was really surprised that his cars were much less gun-encrusted than the first round.
Finally, #4 son (3) was happy to work with us to build and paint some cars as well.
Here's a few pieces of terrain that I put together as well.
The top two are simply large templates cut from black craft foam and grey felt for oil slicks and smoke, respectively. The other two are mines and caltrops and required a bit more work. My wife picked up several small containers of beets at the grocery store, and the tops had a section of plain, clear plastic that looked just right for Gaslands' small template. The mines are buttons whose holes I filled with Milliput and then painted to look dirty and metallic. If you look closely, you can see that there's still some unfortunate putty texture to the top, and this was after I added several layers of gloss varnish to try to smooth out the surface. Good enough for tabletop work, but not as nice as I had hoped for.
The caltrops were the most labor intensive, but also the most fun. I took unused staples and clipped them in half with my wire cutters. This leaves two nice L-shaped bits, and so I glued these together with Goop. That was tedious, because I had to hold these tiny little asterisks still while the glue cured, but it was a good excuse to listen to a podcast. Once that was done, I decided that I wanted them to have a painted look rather than a raw metal look, so I primed them black and painted them a gunmetal color, with a wash to add grime and shade. Once that was done, my plan was to glue them to my small beet-top templates, but holding them next to the cars, I thought the scale looked wrong. I went back with my wire cutters and clipped off about a quarter of each leg. The resulting caltrops are what you see here, superglued to the templates.
The cars were actually completed sometime in early September or late August, judging from the dates on my photos. I started writing this post weeks ago, but despite my claim to the contrary, I was thinking about reshooting all the cars under better lighting condition. This means that the cars have been all over my painting desk since, and the semester has been beating me down, so I haven't done any painting since then. I have some pieces primed that I'm just not excited about, but I happened to receive a shipment earlier this week that is giving me some excitement to paint; watch this blog for future details.
My Miyazaki team has faced down my sons' Mishkin and Slime teams in two rounds of a planned three-round escalating tournament. So far, Mishkin has won each time, so the scores are 10-6-2. Essentially, Mishkin's tournament victory is a fait accompli, but we're still having fun. The escalating part of the season—where you add ten cans to each team between games—is the least interesting part to me, but I like the tournament format with random scenario selection. Turns out Mishkin can really crank out the points in Saturday Night Live.
Thanks for reading. As I said, the semester has been wearing me down, but I think we're transitioning into a quieter period, with all my conferences behind me and students switching into project mode. I have a research protocol that a colleague and I are working on that still needs to be submitted to IRB, and there's still plenty of work to do on our curriculum. I also just found out that I'll be teaching a new course next semester: our graduate-level introduction to software engineering. It's not what I would have chosen for myself, but I'll do my best to make it good. Expect a tilt toward agility.


No comments:
Post a Comment