Here are the steps I followed to get a 3D character from Asset Forge (2.4.1 Deluxe) into Mixamo and from there into Godot Engine (4.2.1). These are notes I took to help me remember my particular process; see the update at the bottom for my recommendations.
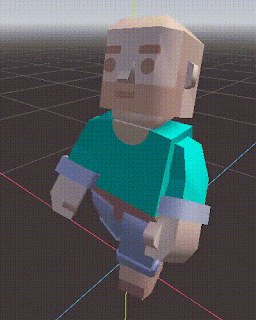 |
End Result
|
Make a thing in Asset Forge. I'd never done this before, so it was a little rocky at first. One of the first things I learned was that I could increase the UI scale in the preferences, which was important since I could not make out the body parts in the character section. The legs and hips don't align with the default snap size, but I discovered that the toolbar widget, right of the two squares, adjusts this amount. Dropping it down to 0.1 allowed me to get the legs both into the hips, although it was tedious to click through the values rather than be able to type them. Once I dropped an arm in place, I had to look up how to mirror the copy for the other side. This is done with the widgets in the top-right of the toolbar, choosing an axis and then mirroring around the selected one (or 'M' as an accelerator).
Export from Asset Forge to FBX. "Merge blocks" needs to be enabled, and the character should be in T-pose, as per the docs.
Import into Mixamo. This was quite easy. For my test model, I changed the Skeleton LOD down to "No fingers."
Export from Mixamo. Select an animation that you want, then choose Download. Make sure you grab this first one "with skin."
Bring that downloaded model into Godot Engine and duplicate it. Name the duplicate after the character (e.g. "bald_guy.fbx"). The original one will be the one from which we'll get the animation, and the copy will be the one from which we'll get the rigged mesh. This is an optional step, but I think it makes things a bit easier to manage.
For any other animations you want from Mixamo, download them one at a time. You can get these without the skins, since you'll be applying them to the character you already downloaded. Bring this all into Godot Engine.
In Godot Engine, double-click the character fbx ("bald_guy.fbx" in my example above) to get the advanced import options. In the Scene root, you can disable importing animations. In the Actions popup, extract the materials and save these someplace convenient, such as a materials folder. This will make it easy to fix some material settings, which is important since they will all come in as metallic, and you probably don't want that.
Now, we can bring in all the animations as animation libraries. Select all the relevant FBX files from the filesystem view (in my case, all of them except "bald_guy.fbx"), then click on the Import tab. Switch from Scene to Animation Library, then click Reimport. If any of these are looping animations, open them individually, go to the mixamo_com animation entry, and select the appropriate loop mode.
All the pieces are now in place. Create a 3D Scene, and drag your character ("bald_guy") into it to instantiate it. Select the node and enable editable children. Now, you can get to the AnimationPlayer node, and under Animation, choose to Manage Animations. Load each of your animations as its own library. Notice that the first animation, the one embedded with the character, will be listed under the name mixamo_com, and all the other animations will be called AnimationName/mixamo_com. The reason we duplicated that initial fbx above was to make it so that the animation name would be sensible here, since we cannot edit it.
From my initial explorations, this approach is robust in the face of needing to change elements of the model. For example, if you tweak the model in Asset Forge, then push it up to Mixamo, rig it, bring it back down, and reimport it, your animations are still stable. I am surprised that I haven't had to even reload the libraries into the animation player.
A relevant disadvantage, though, is that you cannot add your own animations to the animation player.
Note that I tried the Character Animation Combiner, but every time I did so, I lost my textures. I also watched a video about combining animations in Blender, but I haven't tried that technique yet. That approach looks like it could make things a little simpler once in the Engine, particularly to rename the animations in a canonical way, but I also like that I can do this without having to round-trip through yet another tool.
Here's a proof of concept created in Godot Engine where tapping a key transitions between a confident strut and some serious dance moves.
 |
| Simple transitions for confident boogie |
UPDATE: Since taking my initial notes, I tried the approach described in the aforelinked video from FinePointCGI. All things considered, I think that approach is actually simpler than my Blender-avoidance technique. Being able to rename the animations is helpful, as I expected. Having all the animations stored in one .blend file, which can be imported directly into Godot Engine, also saves on cognitive load when looking over the filesystem. I could not have taken his approach without doing the rest of my experimentation, though, coming to understand Asset Forge and Mixamo along the way.
Verdict: Make the model in Asset Forge, upload to Mixamo, let it generate a rig, download all the animations you want (leaving skins on), bring all these into Blender, remove the excess armatures, rename the animations using the action editor of the animation view, save it as a Blender project, import that into Godot Engine, and use the advanced import editor to update looping configurations.

