Last Fall, I started recording short screencasts to support teaching CS222. These primarily were used to continue conversations that had happened in class, but where I did not want to devote more in-class time to them. That is, these were supplemental videos to specific contexts. I used YouTube to disseminate the videos, but I kept them unlisted: only students who had the link were able to find these videos. I received positive feedback from a few students about these videos. I did not think deeply about their longevity, although even as I made them, I wondered what I would do with them after the semester was over.
This semester, my respected colleague David Largent is teaching a section of CS222 for the first time, and so I shared the playlist with him. He suggested that these videos might be useful to current students as well, even though they were not part of the original contexts. I thought about this for some time time, and I have decided to try acting on his suggestion.
The playlist of supplemental material for CS222: Advanced Programming is now public on YouTube. The only item removed from the original, unlisted playlist is a lengthy sample solution to a two-week project. I have not yet decided if I want to re-use that particular assignment or not, so that one is still hidden.
Please feel free to give me some feedback on the videos, whether you are a current CS222 student or not. If they have general value, I might continue to make them public.
Monday, September 7, 2015

Friday, August 28, 2015
I guess I'm an Explorer: Bartle's Player Taxonomy Applied to the CS222 Achievement System
I had a student come to office hours this week with many questions, some of which were about the achievement system I am using in CS222. I had explained on the first day of class that the achievements were inspired by trends in video games. Achievements give a student a way to be recognized for doing something special, for doing something they might not otherwise do that is relevant to the course. As of this writing, I have 25 available achievements for the course, including technical, research, community engagement, and social options. A student who seeks an "A" grade will probably complete five or six.
The student in my office acknowledged the video game inspiration, and then he asked, "So I should try to get all of the achievements?" I was a bit surprised at this, but he explained that he is a completionist: he sees achievements as an incentive from game designers to have players try all the different options, and that to have "the full experience" one needs to get all the achievements. I responded that my intention was not to encourage a complete collection, but rather to incentivize diverse behaviors that were worthy of class credit.
He looked a bit puzzled, so I asked if he was familiar with Richard Bartle's Player Taxonomy. He wasn't, so I gave a little background about MUD and then explained some of the types. I told him that the behavior he described was characteristic of an Achiever, but that another type is Explorer, who seek out all the edges of the system...
And he interrupted me, saying, "Oh, so you must be an Explorer."
I paused, a bit dumbfounded. I had never really thought about it before. I'm sure the question, "What type am I?" had passed through my mind when thinking about the taxonomy, but I certainly didn't have a pat answer. As I thought about the design of the achievement system, I got to thinking about my own behavior as a player. I like to go to all the places and see what's there: I don't have to do all the quests, but I like knowing what they are. So, I told him, it would seem that my behavior is indeed characteristic of an Explore. Look at Bartle's original articulation of an Explorer: "Explorers are proud of their knowledge of the game's finer points, especially if new players treat them as founts of all knowledge." Does that sound like any professors you know?
The more I think about this story, it helps me see how Bartle's taxonomy might be useful for thinking about achievements or digital badges. Socializers are easy: I have achievements that connect my students to other students, alumni, and visitors. I think Achievers are just happy to have a system through which they can gain course credit and get an "A". Explorers have the opportunity to seek out specialized knowledge, in design patterns or build systems for example. As for Killers, I'm not sure how they fit in. At first I thought this was the category for students who argue and complain about the system itself, but I don't think that's quite right. Bartle explains their motivation as, "Killers are proud of their reputation and of their oft-practiced fighting skills." These might actually be my cowboy programmers, the ones who are more interested in showing off what they can hammer out themselves rather than learning new techniques or working on a team.
What do you think: if you compare your player type and your behaviors in school, do you see similar behaviors?
The student in my office acknowledged the video game inspiration, and then he asked, "So I should try to get all of the achievements?" I was a bit surprised at this, but he explained that he is a completionist: he sees achievements as an incentive from game designers to have players try all the different options, and that to have "the full experience" one needs to get all the achievements. I responded that my intention was not to encourage a complete collection, but rather to incentivize diverse behaviors that were worthy of class credit.
He looked a bit puzzled, so I asked if he was familiar with Richard Bartle's Player Taxonomy. He wasn't, so I gave a little background about MUD and then explained some of the types. I told him that the behavior he described was characteristic of an Achiever, but that another type is Explorer, who seek out all the edges of the system...
And he interrupted me, saying, "Oh, so you must be an Explorer."
I paused, a bit dumbfounded. I had never really thought about it before. I'm sure the question, "What type am I?" had passed through my mind when thinking about the taxonomy, but I certainly didn't have a pat answer. As I thought about the design of the achievement system, I got to thinking about my own behavior as a player. I like to go to all the places and see what's there: I don't have to do all the quests, but I like knowing what they are. So, I told him, it would seem that my behavior is indeed characteristic of an Explore. Look at Bartle's original articulation of an Explorer: "Explorers are proud of their knowledge of the game's finer points, especially if new players treat them as founts of all knowledge." Does that sound like any professors you know?
The more I think about this story, it helps me see how Bartle's taxonomy might be useful for thinking about achievements or digital badges. Socializers are easy: I have achievements that connect my students to other students, alumni, and visitors. I think Achievers are just happy to have a system through which they can gain course credit and get an "A". Explorers have the opportunity to seek out specialized knowledge, in design patterns or build systems for example. As for Killers, I'm not sure how they fit in. At first I thought this was the category for students who argue and complain about the system itself, but I don't think that's quite right. Bartle explains their motivation as, "Killers are proud of their reputation and of their oft-practiced fighting skills." These might actually be my cowboy programmers, the ones who are more interested in showing off what they can hammer out themselves rather than learning new techniques or working on a team.
What do you think: if you compare your player type and your behaviors in school, do you see similar behaviors?
Thursday, August 27, 2015
Explaining software craftsmanship with an analogy to music
One of the four essential questions I used for CS222 last year was "What does it mean to practice the craft of software development?" This was inspired by the title of the book we use in the class, Robert C. Martin's Clean Code: A Handbook of Agile Software Craftsmanship. The question is a bit too wordy when what I was really after was getting students to think about craftsmanship. I revised it this year to "What is software craftsmanship?" I had originally avoided the word "craftsmanship" for its genderedness, but I decided to stick with it, secretly hoping that someone might even write about the endemic genderedness in software development.
Walking to campus yesterday for my second day of classes, I was struck by an analogy that I decided to share with my students. I started the class by asking, "Who here plays an instrument?" A little less than half the class raised their hands. Then I asked, "Who is a musician?" Fewer raised their hands. "So, what's the difference?"
I received a great range of answers, which I acknowledged without judging. These included:
Walking to campus yesterday for my second day of classes, I was struck by an analogy that I decided to share with my students. I started the class by asking, "Who here plays an instrument?" A little less than half the class raised their hands. Then I asked, "Who is a musician?" Fewer raised their hands. "So, what's the difference?"
I received a great range of answers, which I acknowledged without judging. These included:
- Musicians can compose.
- Musicians can interpret compositions.
- Musicians perform for other people.
- Musicians are part of a culture of musicians.
- Musicians have more skill.
- Musicians spend more time on music.
Then, I posed this rhetorical response, "OK, so what is the difference between a programmer and software craftsman?"
The point was made, I think. We did not dwell on it, but I could see that it planted a potentially useful seed in the students' minds as we begin fifteen weeks of developing new attitudes and practices around software development.
(At the beginning of every semester, I explain to my students what it means to be on time: it means you are seated, attentive, with your laptop and notebook ready. More specifically, if you come in right before the "bell," you're late, because we start on the hour. I often contextualize this policy by explaining that I am a musician, and musicians know that if you're not early, you're late. This always gets some smiles and nods from students who know how this goes. I'm sure this was an inspiration for my coming up with the analogy.)
Sunday, August 16, 2015
Revising CS222, Summer 2015 Edition
This Fall, I am teaching two sections of CS222. It is my only teaching obligation, but it also the first time I am teaching multiple sections of the course. My daily planning for the course has been relatively coarse-grained, doing a lot of in-class demonstrations and reacting to student questions. This won't scale well to two classes: I already get confused between what we talked about in different courses, so I know it would be troublesome when teaching two sections of the same course. Hence, I am doing more day-by-day planning than I normally do. This also gives me the opportunity to be more intentional about how we spend our time. There were always a few days in this course where I think, "I talked too much today." By planning out more ahead of time, I hope to spend more time having students actively engaged during class meetings.
The overall rhythm of the semester will be the same, with about three weeks of individual assignments, a two-week project completed in pairs, and a nine-week, three-iteration project completed by small teams. Students will be able to earn achievements during the two-week and nine-week projects, and these achievements will contribute to their grades.
The grading system itself underwent the most significant change. I had been using a system based on grade caps: for example, if you failed to earn satisfactory marks on an assignment, your grade was capped at D, and higher levels of grade were "unlocked" by earning achievements. I think many students enjoyed this challenge, especially as the achievements permitted students to play to their strengths and interests. However, some students—usually those on the bubble between success and failure—would find the system disheartening, especially when they unlocked higher-level grades but did not actually earn them. This was certainly a failure of planning on their part, as no part of the grade was ever hidden or secret, but it also plays to their weakness: their difficulty in planning was exactly what hindered them from succeeding within this system. As a result, I have moved to a more conventional weighted average.
To make this work with achievements, which previously unlocked higher-level grades, I now allow students to earn up to 20 achievement credits that contribute to their final grade. When a student claims an achievement, the claim can be validated in one of three ways: the student can make the claim themselves, they can have a peer validate it, or they can ask me to validate it. These earn one, two, and four credits, respectively, and requests for my validation can only be made after a peer validation is complete. The motivation for this is to encourage students to review each others' work and learn from each other, and also to limit the number of times I have to simply kick submissions back to the students for not having met some requirement.
I am taking a similar approach with assignments. Last semester, students had to earn satisfactory marks on the three assignments in order to unlock grades higher than D. However, I spent a lot of time returning student resubmissions in what felt like students throwing ideas at the wall to see what sticks. That is, it was not clear that the students were doing their due diligence, and this was both frustrating and a waste of time. Now, a student must pass a peer review before a resubmission will be accepted. I tinkered with grade incentives to conduct peer reviews, including punishments for approving low-quality work, but I decided to keep it simple: I am hopeful that positive peer pressure will encourage these evaluations, and there's an achievement to be earned for students who do several such evaluations. If this doesn't work, I can always add more rules and regulations around peer evaluations another semester.
We had been using Mercurial on a locally-hosted Redmine server, the interface to which was a bit awkward but not insurmountable. I like Mercurial, especially its elegant command-line, but I decided to switch to Git for the semester since it is more popular and built in to both Eclipse and IntelliJ IDEA. Unfortunately, the Git interface on Redmine is even worse, and fundamentally, no one cares if you can get around in that interface: it has no extrinsic value. I was approved for an educator's GitHub account, and so we're going to try that instead. I was hoping to get more experience with GitHub this summer, but our summer research project has involved much more paper prototyping and analysis than programming. I will need to tinker with GitHub a bit to figure out the tools and workflow, but I've heard good thing, and I know there's a large community of practice that I can hook into if I need it.
After reading Essential Questions, I realized that my standard FizzBuzz example—which I use to teach TDD—was not very authentic. It's obviously a made-up problem, and while it provides an adequate context for learning the basics of TDD, I started thinking about replacing it with something more interesting. I am going to try instead a simple program that computes how many days a person has been alive, in part because it provides a good opportunity to talk about using libraries effectively. Now that I'm using Java 8, I have access to a sane time library without having to use joda-time. I tried whipping up a sample UI, but there's no date picker in Swing. Turns out there is one in JavaFX, however, and so I figured I may as well make the jump to that UI library. I still barely know JavaFX, but I think we can get by enough to give students the sense of it, so that they can use it in their own projects if they want to.
I have started using IntelliJ IDEA in some of my own work, mostly because it's essentially the new standard IDE for Android development. I thought about using IDEA in CS222 as well, because parts of it are quite nice. However, there's one "missing" feature in IDEA that made me stay with Eclipse, and that's how it makes it very easy to ignore warnings. In Eclipse, compiler warnings are highlighted in the code and in the outline view of a project. Students generally come into the course completely ignoring warnings, but this is a habit I want them to break: I want them to think critically about warnings. I try to get them to realize why warnings are worse than errors, specifically because you can ignore them even though something is wrong.
Those are the major changes in CS222. I think that I have hit a lot of the pain points I wrote about in my end-of-semester reflection. I have also completely revised the course Web site to be a single-page application using Polymer, but I think that's a post for another time.
Saturday, July 11, 2015
Painting the Witch-king of Angmar from Middle Earth Quest
Between other painting projects, I have been slowly painting the miniatures from Middle Earth Quest. I was going to link to the Fantasy Flight Games page for it, but in writing this post, it seems the game's page has disappeared. I guess that means you shouldn't get your hopes up for a reprint.


I glued down a few of the ice blocks from my earlier experiments and laid down a generous layer of crackle paint.

Above you can see how it looked after drying. The cracks were much finer than I had wanted, but I decided to move forward anyway. I am sure that part of my problem is that I'm working around a pre-existing figure. This makes me think that in my next set, I may cut the figures off of the bases to see if this gives me a bit more freedom in creative basing.
Notice that it looks like the crackle paint is "crawling" up the side of the figure here—an artifact of trying to work around him. I chipped some of the most egregious parts away, which left a bit of a gap between the mini and the ice effect. This turned out OK, since it gives a bit of contrast, though I would approach it differently if I could do it all again.

I applied this tint to layers of grey to get a nice cold grey on the miniature.


Rather than write long posts about painting a whole game, this is a shorter post about just one figure from the set: The Witch-King of Angmar. I tried a lot of different things with this figure, and so I am sharing some of what I learned here.
After reading this article on ice bases and remembering that Angmar is a frozen land, I decided to try an ice base for the Witch-king. I picked up some Rock Candy Crackle Paint, but I also had some Kroma Crackle after having watched Teri Litorco's video about crackle bases. I decided to try an experiment to see how the two behaved. I found a plastic tray from a Bones miniature and a small round container, and I put some of each crackle medium into both to let them dry. These were pretty thick applications.


Above you see the Rock Candy Crackle Paint. It looks like broken glass when dried, so much so that I found myself treating like broken glass. I popped these shards out and put them into a baggie to use later as glass or ice effects. It took about two days to dry.

The Kroma Crackle took an order of magnitude longer to dry. How long did it take to dry? Well, I played the entirety of Dragon Age: Inquisition while it dried. This dried solid white and is almost velvety. Some spots look like their still not quite cured.
I moved forward with using the Rock Candy on the Witch-king.

My first attempt was to put a cloudy blue-grey underneath a layer of crackle paint, but that did not at all give the effect that I wanted. However, I did have some fun wet blending the colors on the base, which you see above. I have done hardly any wet blending, so a big flat circular base was a good opportunity to practice. After this didn't work, I decided to follow an approach more like I linked earlier: an aqua base with crackle paint on top, to be followed by aqua wash and white drybrushing.

I glued down a few of the ice blocks from my earlier experiments and laid down a generous layer of crackle paint.

Above you can see how it looked after drying. The cracks were much finer than I had wanted, but I decided to move forward anyway. I am sure that part of my problem is that I'm working around a pre-existing figure. This makes me think that in my next set, I may cut the figures off of the bases to see if this gives me a bit more freedom in creative basing.
Notice that it looks like the crackle paint is "crawling" up the side of the figure here—an artifact of trying to work around him. I chipped some of the most egregious parts away, which left a bit of a gap between the mini and the ice effect. This turned out OK, since it gives a bit of contrast, though I would approach it differently if I could do it all again.

Here he is after drybrushing the base.
Painting the figure itself was pretty straightforward. As a black rider, he is naturally dressed all in black. In the boardgame artwork, however, he has a slight blue-green hue:
 |


As part of my research into the lore around this character, I was reminded of the fact that he has a flaming sword. This seemed like a great opportunity to play with a fire-and-ice theme. I went back to this article from Wargaming Tradecraft on fire effects using gels and picked up some Golden Heavy Gloss Gel from Art Mart.
First, I re-primed the sword white and painted it white and bright yellow. I sculpted the flame effect in two layers, painting the inner one in bright yellows and oranges, and then the outer one in a broader range of colors, going to a medium orange in the recesses. The Hot Lead tutorial was a helpful reminder in what colors to use and how to apply them. I found the gel medium to be easy to work with, applying it and teasing up the flames with a simple sculpting tool.
 |
| Re-primed and re-painted |
 |
| First layer wet |
 |
| First layer dry |
 |
| First layer painted |
 |
| Second layer wet |
 |
| Second layer dry |
 |
| Second layer painted |
The final step was to apply some object-source lighting to make it look like the flaming sword is glowing. This was applied primarily on the underside of the right arm and the right back of the cloak. It does not show up so well in the photographs. OSL is still something that I struggle with, because I don't want to overdo it.


This was a fun figure to paint. It was good to try some new techniques on a good quality, inspirational miniature, even though his accompanying board game does not get much table time.
Friday, July 10, 2015
Playing Feng Shui 2, Introductory Adventure
Over the holiday weekend, I got a group of friends together to play Feng Shui 2, a recently-released tabletop RPG. I backed it on Kickstarter on someone's recommendation, but now I cannot tell you whose: it was one of those cases where someone I respect said, "You should back this," so I did. Marketers of crowdfunded projects, take note.
...You might work out who the antagonists are, what they're trying to do, where and in what time juncture they're trying to do it, and which progression of fights will enable the heroes to stop them. (You'll recognize these as the classic 5 Ws of information presentation: who, what, where, when, and fighting.)
This game system matches its inspirational source to a T: a quick jump into action; cinematic, collaboratively authored fight scenes; melodramatic narrative; and only enough connective tissue between fights to get you there.
I'm sure you can read more about the game itself elsewhere. I wanted to share more specific details about my experience running the introductory adventure that comes with the rulebook with my five friends. It was a mixed crowd: two had practically no tabletop RPG experience but lots of board game time, one is an active RPG player, one used to be, and one was a wildcard whose background with games I'm not completely sure. As recommended in the rulebook, I cut out the archetypes and send those out, asking each player to pick the one they would like to play. The archetypes are wonderful: their names and illustrations immediately conjure action movie heroes. We ended up with an Archer, Karate Cop, Masked Avenger, Full-Metal Nutball, and Drifter—even if you don't know the game, you can picture those characters! I restricted them from choosing characters who are not from modern times (Feng Shui crosses at least four time periods) as well as the Driver, since our one-off adventure would not have any chase scenes, and this means fewer rules to remember. It may also be worth noting that I used to run tabletop games all the time, but I was out of it for quite some time. Now, I run the occasional Zorcerer of Zo-inspired game with my sons and I ran half a doomed D&D5e game, but I was approaching the table pretty cold.
[Note: Spoilers about the introductory adventure follow.]
The players all showed up with their archetypes picked, and we had no trouble articulating the concepts and the melodramatic hooks. We did not spend much time on the hooks, knowing that it was a one-off game. However, this exercise made it very easy for the players to buy in to the first scene. It takes place in a community center. The Archer was looking for evidence of corruption, the target of the Masked Avenger's wrath was a donor to the project, the Karate Cop was on duty, the Drifter was in the right place at the right time, and the Full-Metal Nutball could smell impending violence in the air.
Jumping right into the action was easy. I explained the initiative and combat rules, and of course all the heroes charged in to stop the obvious bad guys. Combat requires a bit of mental arithmetic, and I found that I frequently forgot the last step—subtracting Toughness from Smackdown to determine Wound Points. There is promise of an app to help run combat, but it looks like it's planned for iOS only, which doesn't help me (though maybe that would be a good CS222 project to port to Android or a Web app).
All I really needed, though, was a simple tabular presentation of the critical information. I am surprised this was not provided with the adventure, since the book suggests making such a sheet yourself out of scrap paper. I did not prepare mine ahead of time, in part because I wasn't sure how many players would show up, and in part because I was not sure what I needed. If I ran the game again, I would make a simple spreadhsheet that lists, in one place, each villain's name, Defense, Attack, Weapon & Damage, Toughness, and Speed, with a spot for wound points and impairments. It was obnoxious to flip pages to find this information during the fight, taking away from the otherwise elegant rhythm of kicks, punches, bullets, and arrows.
During the battle, I thought the mooks' defense was strangely high. Turns out it was much higher than the mooks encountered later. It must be a typographic error: use 8 instead, not 15.
I am glad that I informed the players that Feng Shui encourages a three-act, three-fight structure. This helped them determine how and when to spend their Fortune points during the afternoon. These are a strictly-depleting resource.
The players had no trouble after the fight assembling themselves into a heroic force of justice, although it took some time for them to determine what to do next. I suspect some of the more risk-averse players, including the regular and old-time tabletop RPG players, were afraid of walking into a trap or getting into an impossible situation. It was here that one of the tabletop-novices really understood the game, as he pointed out, "What's the worst that will happen? If we get captured, we'll fight our way out!" Spot on!
The next battle went by the books, my improvising a few rules rather than bothering to look them up. The players enjoyed getting the drop on the enemies, and it was a quick battle. Here I realized though that the quality of "things that can happen in this battle" deteriorates through the adventure. The rules strongly recommend that everyone have a list of cinematic things for characters to do on their turns, for when inspiration for improvisation fails. The person running the game needs even more of these, of course, but I found the ones provided by the adventure lacking after the first encounter. If I were to run the game again, I would strongly recommend that players come up with stock actions and catch-phrases for their characters, and I would prep a much longer list of setting- and villain-specific actions. I was getting physically tired, and I am sure some of the villains' actions were less interesting than others. Actually, I found that I defaulted to kind of a slapstick description, not when I really wanted to, but it's what came to mind. Better to have some pre-written statements to set the tone.
Between the second and final battle is an opportunity to meet a character who can explain the whole situation, which really ends up being an overview of the entire Feng Shui setting. Without giving away too much, it includes wizards from the distant past, ascended animal spirits from the more recent past, global conspiracy, and futuristic cyborgs, apes, and mutants. As mentioned above, I was getting pretty tired at this point, and I was forgetting some of the names of the factions and characters—there are lots of them!—and I wished I had a prepared statement for this character. If I had created the world, I am sure my improvization would have been fine. In effect, however, this was like an oral exam after having read a novella, and I fear I did not instill in the players a sense of awe and wonder... probably more of a sense of confusion and a desire to skip the cinematic and get back into the action.
The final battle went well, the heroes saved the day, and they became heirs to the legend of the Dragons. It felt a bit like the pilot episode of a series that will probably never air, or if it did, many of the actors would suddenly change.
The game system does an excellent job of encouraging collaborative construction of cinematic moments. We all got into the rhythm of picking a target, rolling the dice, and narrating the action. Almost everyone used their skills during the connective tissue (the time between fights) to advance the story forward, and many of the players referenced each others' success and failures in their own narrative. The rhythm of the game, combined with the fact that it takes place in the theatre of the mind, kept everything moving forward so that we could complete the adventure within the five hours we had.
I do think that five was too many players. If you imagine a Hong Kong action movie, it's easy to think of fights with one, two, maybe three heroes, but five is too many to split screen time. More heroes means more villains, which means it's harder to keep track of who is engaged with whom. Again, the lack of miniatures and hexes is a strength here, but this also means that there's a lot to hold in short term memory. (We also had a screaming baby with us, which didn't really help our focus.)
The introductory adventure tries too hard to introduce the setting too, especially if used as a one-off session. Sure, there's some ape-people and futuristic weaponry, but you cannot do anything with this if you're just meeting once. Even if I were to set a campaign in the Chi War, I would rather take the pace more slowly, introducing the paranormal elements one at a time, so that the players have time to digest it. I suppose this introductory adventure would not have any significant mental weight to players who were familiar with the Chi War, or who had played the first edition of the game, but it was too heavy for my tastes. It would be fairly easy to replace most or all of the futuristic elements of the adventure with organized crime—and then in a campaign, players may realize later that these were part of the global conspiracy.
I thoroughly enjoyed reading the Feng Shui 2 rulebook: it made great reading material for conference travel. It's tempting to think about running the game again or maybe even a short campaign, but it is hard these days for me to carve out the time required. I have enjoyed starting a Viking-inspired PDQ game with my boys a few weeks ago, but who knows, maybe if enough of you put pressure on me, we can bust out the chop-socky action together another time.
Feng Shui is a combat-oriented game inspired by Hong Kong action movies. My favorite quotation from the rulebook sums it up, from page 212 about how to write characters' melodramatic hooks into game sessions:
...You might work out who the antagonists are, what they're trying to do, where and in what time juncture they're trying to do it, and which progression of fights will enable the heroes to stop them. (You'll recognize these as the classic 5 Ws of information presentation: who, what, where, when, and fighting.)
This game system matches its inspirational source to a T: a quick jump into action; cinematic, collaboratively authored fight scenes; melodramatic narrative; and only enough connective tissue between fights to get you there.
I'm sure you can read more about the game itself elsewhere. I wanted to share more specific details about my experience running the introductory adventure that comes with the rulebook with my five friends. It was a mixed crowd: two had practically no tabletop RPG experience but lots of board game time, one is an active RPG player, one used to be, and one was a wildcard whose background with games I'm not completely sure. As recommended in the rulebook, I cut out the archetypes and send those out, asking each player to pick the one they would like to play. The archetypes are wonderful: their names and illustrations immediately conjure action movie heroes. We ended up with an Archer, Karate Cop, Masked Avenger, Full-Metal Nutball, and Drifter—even if you don't know the game, you can picture those characters! I restricted them from choosing characters who are not from modern times (Feng Shui crosses at least four time periods) as well as the Driver, since our one-off adventure would not have any chase scenes, and this means fewer rules to remember. It may also be worth noting that I used to run tabletop games all the time, but I was out of it for quite some time. Now, I run the occasional Zorcerer of Zo-inspired game with my sons and I ran half a doomed D&D5e game, but I was approaching the table pretty cold.
[Note: Spoilers about the introductory adventure follow.]
The players all showed up with their archetypes picked, and we had no trouble articulating the concepts and the melodramatic hooks. We did not spend much time on the hooks, knowing that it was a one-off game. However, this exercise made it very easy for the players to buy in to the first scene. It takes place in a community center. The Archer was looking for evidence of corruption, the target of the Masked Avenger's wrath was a donor to the project, the Karate Cop was on duty, the Drifter was in the right place at the right time, and the Full-Metal Nutball could smell impending violence in the air.
Jumping right into the action was easy. I explained the initiative and combat rules, and of course all the heroes charged in to stop the obvious bad guys. Combat requires a bit of mental arithmetic, and I found that I frequently forgot the last step—subtracting Toughness from Smackdown to determine Wound Points. There is promise of an app to help run combat, but it looks like it's planned for iOS only, which doesn't help me (though maybe that would be a good CS222 project to port to Android or a Web app).
All I really needed, though, was a simple tabular presentation of the critical information. I am surprised this was not provided with the adventure, since the book suggests making such a sheet yourself out of scrap paper. I did not prepare mine ahead of time, in part because I wasn't sure how many players would show up, and in part because I was not sure what I needed. If I ran the game again, I would make a simple spreadhsheet that lists, in one place, each villain's name, Defense, Attack, Weapon & Damage, Toughness, and Speed, with a spot for wound points and impairments. It was obnoxious to flip pages to find this information during the fight, taking away from the otherwise elegant rhythm of kicks, punches, bullets, and arrows.
During the battle, I thought the mooks' defense was strangely high. Turns out it was much higher than the mooks encountered later. It must be a typographic error: use 8 instead, not 15.
I am glad that I informed the players that Feng Shui encourages a three-act, three-fight structure. This helped them determine how and when to spend their Fortune points during the afternoon. These are a strictly-depleting resource.
The players had no trouble after the fight assembling themselves into a heroic force of justice, although it took some time for them to determine what to do next. I suspect some of the more risk-averse players, including the regular and old-time tabletop RPG players, were afraid of walking into a trap or getting into an impossible situation. It was here that one of the tabletop-novices really understood the game, as he pointed out, "What's the worst that will happen? If we get captured, we'll fight our way out!" Spot on!
The next battle went by the books, my improvising a few rules rather than bothering to look them up. The players enjoyed getting the drop on the enemies, and it was a quick battle. Here I realized though that the quality of "things that can happen in this battle" deteriorates through the adventure. The rules strongly recommend that everyone have a list of cinematic things for characters to do on their turns, for when inspiration for improvisation fails. The person running the game needs even more of these, of course, but I found the ones provided by the adventure lacking after the first encounter. If I were to run the game again, I would strongly recommend that players come up with stock actions and catch-phrases for their characters, and I would prep a much longer list of setting- and villain-specific actions. I was getting physically tired, and I am sure some of the villains' actions were less interesting than others. Actually, I found that I defaulted to kind of a slapstick description, not when I really wanted to, but it's what came to mind. Better to have some pre-written statements to set the tone.
Between the second and final battle is an opportunity to meet a character who can explain the whole situation, which really ends up being an overview of the entire Feng Shui setting. Without giving away too much, it includes wizards from the distant past, ascended animal spirits from the more recent past, global conspiracy, and futuristic cyborgs, apes, and mutants. As mentioned above, I was getting pretty tired at this point, and I was forgetting some of the names of the factions and characters—there are lots of them!—and I wished I had a prepared statement for this character. If I had created the world, I am sure my improvization would have been fine. In effect, however, this was like an oral exam after having read a novella, and I fear I did not instill in the players a sense of awe and wonder... probably more of a sense of confusion and a desire to skip the cinematic and get back into the action.
The final battle went well, the heroes saved the day, and they became heirs to the legend of the Dragons. It felt a bit like the pilot episode of a series that will probably never air, or if it did, many of the actors would suddenly change.
The game system does an excellent job of encouraging collaborative construction of cinematic moments. We all got into the rhythm of picking a target, rolling the dice, and narrating the action. Almost everyone used their skills during the connective tissue (the time between fights) to advance the story forward, and many of the players referenced each others' success and failures in their own narrative. The rhythm of the game, combined with the fact that it takes place in the theatre of the mind, kept everything moving forward so that we could complete the adventure within the five hours we had.
I do think that five was too many players. If you imagine a Hong Kong action movie, it's easy to think of fights with one, two, maybe three heroes, but five is too many to split screen time. More heroes means more villains, which means it's harder to keep track of who is engaged with whom. Again, the lack of miniatures and hexes is a strength here, but this also means that there's a lot to hold in short term memory. (We also had a screaming baby with us, which didn't really help our focus.)
The introductory adventure tries too hard to introduce the setting too, especially if used as a one-off session. Sure, there's some ape-people and futuristic weaponry, but you cannot do anything with this if you're just meeting once. Even if I were to set a campaign in the Chi War, I would rather take the pace more slowly, introducing the paranormal elements one at a time, so that the players have time to digest it. I suppose this introductory adventure would not have any significant mental weight to players who were familiar with the Chi War, or who had played the first edition of the game, but it was too heavy for my tastes. It would be fairly easy to replace most or all of the futuristic elements of the adventure with organized crime—and then in a campaign, players may realize later that these were part of the global conspiracy.
I thoroughly enjoyed reading the Feng Shui 2 rulebook: it made great reading material for conference travel. It's tempting to think about running the game again or maybe even a short campaign, but it is hard these days for me to carve out the time required. I have enjoyed starting a Viking-inspired PDQ game with my boys a few weeks ago, but who knows, maybe if enough of you put pressure on me, we can bust out the chop-socky action together another time.
Monday, June 1, 2015
Painting Imperial Assault, Part 2: The Uniques
In part 1 of the series, I talked about painting the non-unique miniatures in Imperial Assault. Today, I share my experience painting the rest of the set. For all of these figures, I used the color schemes provided in the game or movies. These were all painted using black primer and then layering up to the highlight colors, once again following the basic technique endorsed by Doctor Faust's Painting Clinic. On most of them, I sparingly used black or dark brown ink pinwashing to enhance the contrast.
A friend asked for lots of shots, so I'm sharing pretty much all of my "done" pictures. I keep a private painting album on Google+ Photos where I keep notes about what I was doing, what paints I was mixing, and so on. Well, in theory, that's where I put those notes... it seems that lately I've been taking pictures and then forgetting to caption them until I cannot remember what I really mixed. Since they're one-off figures, it probably doesn't matter. The point is, I'm showing a lot of pictures, which I figure you won't mind, dear reader, otherwise why would you be here?
I started with Jyn Odan, and I think she is actually my favorite. The color scheme was fun and vibrant. Her shoes were not shown in any of the game's art: I decided to keep the bright orange-and-white theme, resulting in some cool space kicks. Her face did not have a lot of detail, but I believe I was able to give it some depth through layering flesh tones. The gun is rather conservative, but I think it works for her given the rich colors in the rest of the model.


Next, I turned to a cultural icon: Luke Skywalker. He's clearly in his Tatooine garb, so I used movie stills for inspiration. The outfit is not very interesting, really, but I am very pleased with the result here, in part because it was an experiment in warm whites. Looking at him in isolation, his shirt looks white, but put him next to the stark white of a storm trooper, and you'll see that it looks more like linen. Although he lacks the interesting detail and pose of the previous figure, I think the figure turned out well. Matching the skin and hair color may have been the most stressful part, but I think it's a fair match. Also, like the previous figure, the gun is pretty conservative, although I added some colored bits.


From son to father (which I suspect is not a spoiler for anyone reading my blog)—the next figure is Darth Vader. As Luke Skywalker was a study in whites, Vader is of course a study in blacks. Through many layers of grey I was able to get a result that fills the bill. The colored accents on his chest are subtle, which is good. The second picture shows how I used an object-source lighting effect to give the illusion of a glowing lightsaber: a few layers of red glaze on the cape make this work. I thought about making this even stronger, but I think I like it as a subtle glow. Also, the pictures don't show this, but the figure is also an experiment in multiple varnishes. Looking at stills from the first movie, it's clear that there are very different materials making up his outfit; on the miniature, I've used gloss varnish on his helmet, flat on the cloth parts, and a slightly-satin varnish on the rest. I think it works well, but it's hard or impossible to photograph.


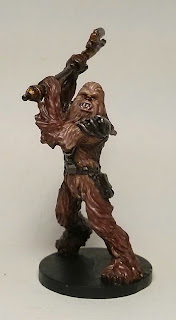
Away from the icons, back to the game characters. Next up is Gaarhkan, who gets this set's prize for requiring the most restarts. I tried two or three times to build him up using drybrushing, as I did reasonably well with the cave bears in Wrath of Ashardalon... although looking back in them now, they are kind of bland. Anyway, I kept having a problem where the figure looked dusty, and I wasn't getting the color variations that I wanted. The face in particular was troublesome. Something inspired me to break apart the figure into separate colored regions. I tried using a darker base color on the legs and forearms, and a lighter one on the chest and upper arms, and then instead of drybrushing, I layered highlights onto the raised areas, as well as a few freehand lines to enhance the texture. This worked much better. My miniature is still probably a bit darker brown than the card art, but I think it's a good wookie, and nobody will complain if he looks like Chewbacca.
The weapon required some reworking as well, as my ink-over-metallic tinting approach went wonky the first time around: I ended up with some spots where the ink pooled or got extra layers, and it became splotchy. In the revision, I went to a more conventional approach to painting bronze or copper, with a brown undercoat and gold paint mixed with browns. Dark inks did help me add shadow and texture to the business end of the weapon.


Here is Gideon Argus, who, judging from his coat, used to work at Ralston Purina. It was actually several days after I thought I had finished him that I realized I forgot to paint the insignia on his coat, so some of the photos show this part still unpainted. He is primarily earth tones, and I think the highlights turned out nicely. Dark inks were helpful in accenting the shadows between his coat and his shirt. I painted the binoculars to look like the white ones from Empire Strikes Back, and this was a case where a black ink wash was essential to getting good contrast. I was a bit more creative with his pistol, where I used the same yellow-ink-over-metallic-paint effect as on the probe droids to get a nice copper sheen.
This figure's head was perhaps the most finely detailed of the heroes, and I am happy with how it came out. Conventional advice is not to paint eyebrows on miniatures, but I think these really help tie the face together, between the brown bald head and grey bushy beard. Incidentally, the beard was done with fine lines and edging, not drybrushing, as with the wookie.


Next up is Fenn Signis, who wins the Most Star Warsy Name Award. Like the previous figure, he's mostly earth tones, except this guy has a fabulous scarf. As he's the soldier type, I decided to go with a conventional gun design, by modern standards. I think his flesh tone is interesting. One detail of which I am particular proud is his right forearm: the model is completely smooth here, but I used some shading variation to give the illusion of muscle tone. I freehanded the Rebel insignia on his right shoulder, and I think it is decent, though hard to see due to low contrast.


Time for more non-humans. This is Mak Eshka'rey, a bothan who clearly likes black and green. This is another one that took a few tries to get the skin colors to match the illustrations, but I think the result is fair. Assuming I'm right about his being a bothan, he's supposed to be covered in hair like a horse. I tried to give this illusion by some thin parallel lines around the arm, which is molded smoothly. His hair—pulled into a pony tail in what I assume is a terrible artist's joke—was sculpted with ridges, which makes it easier to give the effect there. His eyepiece was painted first with a white-to-grey transition (top to bottom) and then hit with multiple layers of yellow ink. In the illustrations, his weapon is a monochrome metal piece, and so I used that here too. Also, for what it's worth, the "black" of his suit is actually an almost-black green, which gives a good variation in black shade when put next to someone like Vader.


The last of the heroes is Diala Passil. I think my mix of Vallejo Purple and white is a good match for her skin tone, although I did not highlight it enough on my first pass. The bandages around her hands and feet were frustrating. In the illustration, they are fairly loose, with flesh showing, but in the sculpt there was no easy way to see how I could accomplish this look. Also, the detail was not fine enough that a wash really gave the contrast I desired. The end result is passable in that, if you know they're supposed to be wrapped around her hands and feet, it looks like that, but I would have liked it to be more apparent. I thought about going back over it and trying to pinwash in the cracks, but as I said, the detail isn't really there, and I was not keen on revisiting this part of the model.
The other major frustration is the mediocre OSL job. I had everything else done, of course, when I tried to add a glow effect to her lightsaber. In re-reading about how to do this, one of the sources I came across referred to the problem of "chalkiness" with light-colored paints, and I think that's what bit me here. The effect works from arms-length, in that you can tell that it's a glow and not something else, but I'm not very happy with it. The OSL effect hits almost every color on her, each of which was a custom mix that would be very hard to match, so it's not like I could easy patch it and re-do it. Maybe I'll give her a full repaint job someday, but first I should figure out if she's worth playing or not. If she sits in a box, it doesn't matter if the effect is a bit sloppy. In truth, I was probably impatient with it: it was not work that was done in the quiet, relaxed focus of painting, but rather done as a distraction from work.


That's it for the humanoids, and so the last unique piece is the AT-ST walker. I saved this for last partially because I wasn't really sure what to do with it, and partially because I find painting big models to be kind of tedious. A friend told me that if you're not enjoying painting, you shouldn't do it; yet, can you imagine the incongruity of an unpainted walker causing mayhem to our heroes? I knew I could use a layering approach as I had with all the heroes, but given the large surface area, that would take a long time. I don't have an airbrush, so I needed something that would work with plain old brushes. I poked around the Web a bit and found Sorastro's guide, which was quite nice so I decided to give it a shot.
Unlike the guide, I started with black primer, because that's what I have. The base layers of grey went on fine. I used my own ink wash instead of the Citadel Nuln Oil; mine was mixed with black ink, a smidgen of sepia ink, Future Shine, and water. My walker came out much grimier than Sorastro's, I think because I washed too large areas before wiping it down: the ink had more time to tint the paint before it was removed. The result is not quite what I wanted, but it's not bad: it just looks more weathered. In fact, it looked weathered enough that I did not end up adding any more rust or grime effects. It does have a different motif than the other models in the set, for which I kept a very "clean" look. If I could do it again, I would wash smaller areas at a time.


With everything painted, I sat down with my wife and son to try the Learn to Play scenario. We had a good time, and I'm currently trying to gather a group of friends to try out the campaign mode. Here is a photo of the first time the painted minis hit the table.

I enjoyed painting this set. I grew up with Star Wars, and it was fun to reminisce about the movies and childhood make-believe while painting. I'm happy to have seen all three Star Wars movies, and maybe this fourth one coming out in December will live up to the hype.
Reflecting on the painting itself, I realized while working on this set that I should probably be using more contrast—brighter highlights in particular. Miniatures always look different under the painting lamp than they do on the table. I tried to keep the set coherent, but I think for my next project, I will try to practice contrast and highlighting. Also, I had some pangs of regret regarding not having based these miniatures, the decision I described in part one is probably still a good one. Sorastro's series mentions a similarly-justified decision in his first episode, that since the figures will be moving across many different terrains, it makes narrative sense to keep the bases neutral. Still, when I look at these and compare them to some other figures I have worked on, they do like kind of naked. I may need to make sure my next set gives me a good excuse for creative basing as well.
Thanks for reading!

A friend asked for lots of shots, so I'm sharing pretty much all of my "done" pictures. I keep a private painting album on Google+ Photos where I keep notes about what I was doing, what paints I was mixing, and so on. Well, in theory, that's where I put those notes... it seems that lately I've been taking pictures and then forgetting to caption them until I cannot remember what I really mixed. Since they're one-off figures, it probably doesn't matter. The point is, I'm showing a lot of pictures, which I figure you won't mind, dear reader, otherwise why would you be here?
I started with Jyn Odan, and I think she is actually my favorite. The color scheme was fun and vibrant. Her shoes were not shown in any of the game's art: I decided to keep the bright orange-and-white theme, resulting in some cool space kicks. Her face did not have a lot of detail, but I believe I was able to give it some depth through layering flesh tones. The gun is rather conservative, but I think it works for her given the rich colors in the rest of the model.


Next, I turned to a cultural icon: Luke Skywalker. He's clearly in his Tatooine garb, so I used movie stills for inspiration. The outfit is not very interesting, really, but I am very pleased with the result here, in part because it was an experiment in warm whites. Looking at him in isolation, his shirt looks white, but put him next to the stark white of a storm trooper, and you'll see that it looks more like linen. Although he lacks the interesting detail and pose of the previous figure, I think the figure turned out well. Matching the skin and hair color may have been the most stressful part, but I think it's a fair match. Also, like the previous figure, the gun is pretty conservative, although I added some colored bits.


From son to father (which I suspect is not a spoiler for anyone reading my blog)—the next figure is Darth Vader. As Luke Skywalker was a study in whites, Vader is of course a study in blacks. Through many layers of grey I was able to get a result that fills the bill. The colored accents on his chest are subtle, which is good. The second picture shows how I used an object-source lighting effect to give the illusion of a glowing lightsaber: a few layers of red glaze on the cape make this work. I thought about making this even stronger, but I think I like it as a subtle glow. Also, the pictures don't show this, but the figure is also an experiment in multiple varnishes. Looking at stills from the first movie, it's clear that there are very different materials making up his outfit; on the miniature, I've used gloss varnish on his helmet, flat on the cloth parts, and a slightly-satin varnish on the rest. I think it works well, but it's hard or impossible to photograph.


Away from the icons, back to the game characters. Next up is Gaarhkan, who gets this set's prize for requiring the most restarts. I tried two or three times to build him up using drybrushing, as I did reasonably well with the cave bears in Wrath of Ashardalon... although looking back in them now, they are kind of bland. Anyway, I kept having a problem where the figure looked dusty, and I wasn't getting the color variations that I wanted. The face in particular was troublesome. Something inspired me to break apart the figure into separate colored regions. I tried using a darker base color on the legs and forearms, and a lighter one on the chest and upper arms, and then instead of drybrushing, I layered highlights onto the raised areas, as well as a few freehand lines to enhance the texture. This worked much better. My miniature is still probably a bit darker brown than the card art, but I think it's a good wookie, and nobody will complain if he looks like Chewbacca.
The weapon required some reworking as well, as my ink-over-metallic tinting approach went wonky the first time around: I ended up with some spots where the ink pooled or got extra layers, and it became splotchy. In the revision, I went to a more conventional approach to painting bronze or copper, with a brown undercoat and gold paint mixed with browns. Dark inks did help me add shadow and texture to the business end of the weapon.


Here is Gideon Argus, who, judging from his coat, used to work at Ralston Purina. It was actually several days after I thought I had finished him that I realized I forgot to paint the insignia on his coat, so some of the photos show this part still unpainted. He is primarily earth tones, and I think the highlights turned out nicely. Dark inks were helpful in accenting the shadows between his coat and his shirt. I painted the binoculars to look like the white ones from Empire Strikes Back, and this was a case where a black ink wash was essential to getting good contrast. I was a bit more creative with his pistol, where I used the same yellow-ink-over-metallic-paint effect as on the probe droids to get a nice copper sheen.
This figure's head was perhaps the most finely detailed of the heroes, and I am happy with how it came out. Conventional advice is not to paint eyebrows on miniatures, but I think these really help tie the face together, between the brown bald head and grey bushy beard. Incidentally, the beard was done with fine lines and edging, not drybrushing, as with the wookie.


Next up is Fenn Signis, who wins the Most Star Warsy Name Award. Like the previous figure, he's mostly earth tones, except this guy has a fabulous scarf. As he's the soldier type, I decided to go with a conventional gun design, by modern standards. I think his flesh tone is interesting. One detail of which I am particular proud is his right forearm: the model is completely smooth here, but I used some shading variation to give the illusion of muscle tone. I freehanded the Rebel insignia on his right shoulder, and I think it is decent, though hard to see due to low contrast.


Time for more non-humans. This is Mak Eshka'rey, a bothan who clearly likes black and green. This is another one that took a few tries to get the skin colors to match the illustrations, but I think the result is fair. Assuming I'm right about his being a bothan, he's supposed to be covered in hair like a horse. I tried to give this illusion by some thin parallel lines around the arm, which is molded smoothly. His hair—pulled into a pony tail in what I assume is a terrible artist's joke—was sculpted with ridges, which makes it easier to give the effect there. His eyepiece was painted first with a white-to-grey transition (top to bottom) and then hit with multiple layers of yellow ink. In the illustrations, his weapon is a monochrome metal piece, and so I used that here too. Also, for what it's worth, the "black" of his suit is actually an almost-black green, which gives a good variation in black shade when put next to someone like Vader.


The last of the heroes is Diala Passil. I think my mix of Vallejo Purple and white is a good match for her skin tone, although I did not highlight it enough on my first pass. The bandages around her hands and feet were frustrating. In the illustration, they are fairly loose, with flesh showing, but in the sculpt there was no easy way to see how I could accomplish this look. Also, the detail was not fine enough that a wash really gave the contrast I desired. The end result is passable in that, if you know they're supposed to be wrapped around her hands and feet, it looks like that, but I would have liked it to be more apparent. I thought about going back over it and trying to pinwash in the cracks, but as I said, the detail isn't really there, and I was not keen on revisiting this part of the model.
The other major frustration is the mediocre OSL job. I had everything else done, of course, when I tried to add a glow effect to her lightsaber. In re-reading about how to do this, one of the sources I came across referred to the problem of "chalkiness" with light-colored paints, and I think that's what bit me here. The effect works from arms-length, in that you can tell that it's a glow and not something else, but I'm not very happy with it. The OSL effect hits almost every color on her, each of which was a custom mix that would be very hard to match, so it's not like I could easy patch it and re-do it. Maybe I'll give her a full repaint job someday, but first I should figure out if she's worth playing or not. If she sits in a box, it doesn't matter if the effect is a bit sloppy. In truth, I was probably impatient with it: it was not work that was done in the quiet, relaxed focus of painting, but rather done as a distraction from work.


That's it for the humanoids, and so the last unique piece is the AT-ST walker. I saved this for last partially because I wasn't really sure what to do with it, and partially because I find painting big models to be kind of tedious. A friend told me that if you're not enjoying painting, you shouldn't do it; yet, can you imagine the incongruity of an unpainted walker causing mayhem to our heroes? I knew I could use a layering approach as I had with all the heroes, but given the large surface area, that would take a long time. I don't have an airbrush, so I needed something that would work with plain old brushes. I poked around the Web a bit and found Sorastro's guide, which was quite nice so I decided to give it a shot.
Unlike the guide, I started with black primer, because that's what I have. The base layers of grey went on fine. I used my own ink wash instead of the Citadel Nuln Oil; mine was mixed with black ink, a smidgen of sepia ink, Future Shine, and water. My walker came out much grimier than Sorastro's, I think because I washed too large areas before wiping it down: the ink had more time to tint the paint before it was removed. The result is not quite what I wanted, but it's not bad: it just looks more weathered. In fact, it looked weathered enough that I did not end up adding any more rust or grime effects. It does have a different motif than the other models in the set, for which I kept a very "clean" look. If I could do it again, I would wash smaller areas at a time.


With everything painted, I sat down with my wife and son to try the Learn to Play scenario. We had a good time, and I'm currently trying to gather a group of friends to try out the campaign mode. Here is a photo of the first time the painted minis hit the table.

I enjoyed painting this set. I grew up with Star Wars, and it was fun to reminisce about the movies and childhood make-believe while painting. I'm happy to have seen all three Star Wars movies, and maybe this fourth one coming out in December will live up to the hype.
Reflecting on the painting itself, I realized while working on this set that I should probably be using more contrast—brighter highlights in particular. Miniatures always look different under the painting lamp than they do on the table. I tried to keep the set coherent, but I think for my next project, I will try to practice contrast and highlighting. Also, I had some pangs of regret regarding not having based these miniatures, the decision I described in part one is probably still a good one. Sorastro's series mentions a similarly-justified decision in his first episode, that since the figures will be moving across many different terrains, it makes narrative sense to keep the bases neutral. Still, when I look at these and compare them to some other figures I have worked on, they do like kind of naked. I may need to make sure my next set gives me a good excuse for creative basing as well.
Thanks for reading!

Subscribe to:
Posts (Atom)