Tuesday, October 11, 2016

Painting Myth

Over the summer, I met a colleague for coffee to talk about research, and the conversation turned to board games. He told me that one of his favorite games is Myth, by Megacon Games. I had heard of this one for two reasons: it was an early Kickstarter success in miniature-driven board games, and it is developed by an Indianapolis-area company. I decided to check out the Megacon booth at GenCon a few days later, and I was impressed by their display and friendly staff. Normally I attend GenCon to enjoy the sights but don't actually buy anything, but this year I ended up taking home a copy of Myth along with a con bonus Trickster hero. I gave the game a spin with my wife and son, and it was pretty rocky on the first go, but we still had fun, and so I decided to make it my next painting project.

The first decision I had to make was what to do with the bases. Most board game miniatures come with plain bases, but Myth figures are on strangely-sculpted bases. Here's one of the textured ones, although others combine this motif with chunks of flagstone.


Some folks have just painted these as-is, but I wasn't sure I liked the look of them. Others went all-out custom sculpt, which looks amazing, but I didn't want to spend that much time on them. I still have a small box of custom ballast mix that I used on my last painting project, so I tried just gluing that down and drybrushing it, and that worked fine. You'll see this in the finished photos below.

This was around the time that Ghool starting posting painting videos regularly to YouTube, and many of these feature characters from Myth. His paint jobs are amazing, although somewhere he mentioned that the minions would be well-served by a simple base coat and shade. Good enough for Ghool is good enough for me! I started in with the crawlers.

Crawlers

Looking at the unpainted ones originally, it was hard to tell that there even were different sculpts; painting the ranged crawlers with green poison glands makes them much easier to pick out on the table and in the box. Also, I should mention that with all the figures in this set, I am mostly following the color schemes on the card art. These crawlers were done with light highlighting after the base coat and wash, which gave them a much livelier appearance than before. For the bases, I didn't even flock them, because I wanted them to look like they could be on barren earth or in a cave, and I think it turned out fine.

Grubbers
Similar approach used for the grubbers: base coat in muted green with a dark green wash, various browns for the cloth shaded with darn brown wash. After this they looked a bit too dark, so I went in and added two highlights quickly to the skin. Even though it was a little sloppy, it added a lot of "pop" to the figures.

Now, away from the minions and on to the captains!

Stalkers
These stalkers gave me a great opportunity to practice smooth blends on curved surfaces using two-brush blending. The color scheme is really wild, much bolder than what I usually paint, and this made it something of visual treat for me. (This is also where I found the new white balancing feature in Snapseed. The previous pictures were re-balanced from the originals.)

Muckers
Next up are the muckers, who—as we all know—are the bosses of the grubbers. Also, it appears they are the masters of the do-si-do. I was able to match the skin tone well with their smaller kin, but these were painted with much more care, using two-brush blending across most of the figures. I thought about varying the paint scheme on them since there are two, maybe changing the color of their towel/stole/scarf, but I decided to just keep them the same for expediency. It's hard to imagine a game situation where I will regret that, but we'll see.

Terror with 1,000 Legs


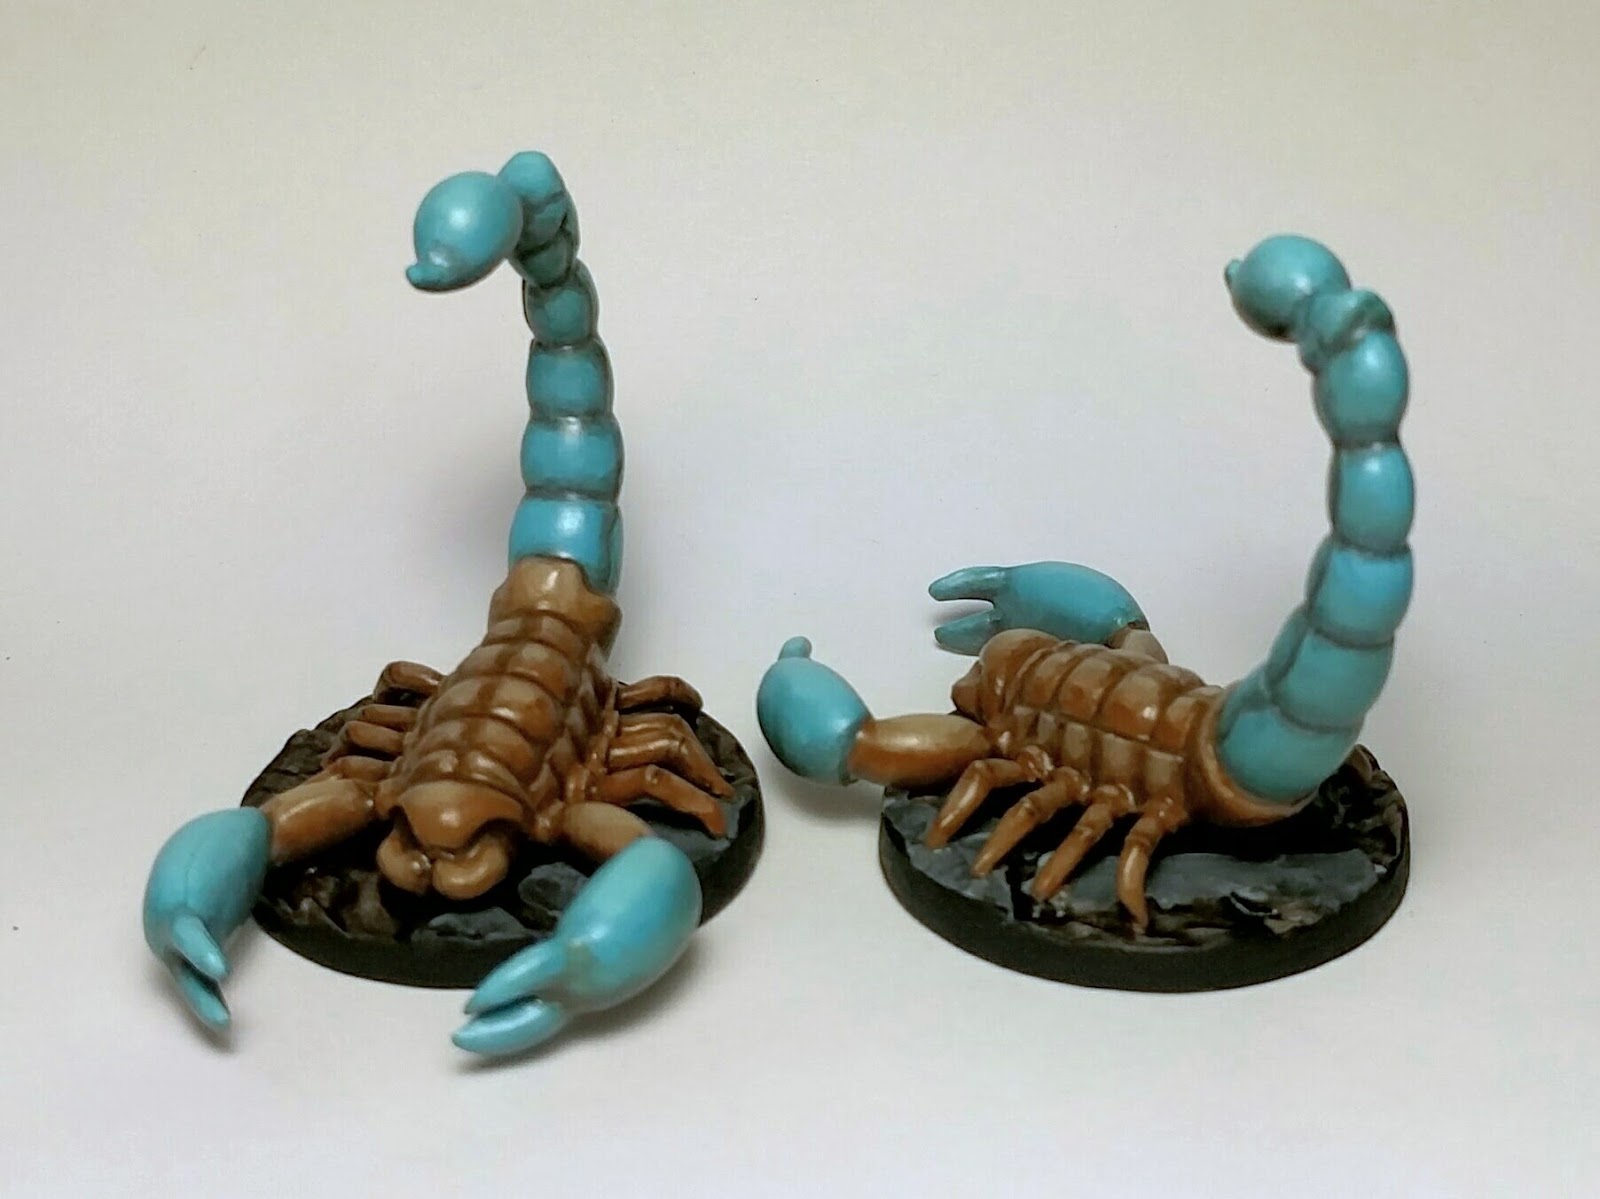
Back to the insects, I moved on to the Terror with 1,000 Legs—the "big bad" of the Myth base set. Again, lots of two-brush blending over big, curved areas, and I think it looks pretty good. The pale maggots were fun to paint as high-contrast against the red-brown Terror.

One thing you cannot tell from the pictures is that my Terror was quite badly affixed to its base. All the miniatures in Myth come pre-assembled and attached to their bases, and although the assembly is generally good, some of them were poorly attached to the base. The Terror in particular was about 2mm higher on one side than the other. Originally I tried sculpting a base from Milliput to compensate, but it was its left side that was higher—the side with the maggot at ground level. The result, then, was an odd little shelf that held the maggot off the side, and it looked too goofy. I chipped the Milliput away and used my new razor saw to cut the creature right off its base and, together with my files, level off the bottom of the Terror. I pinned the terror to the base in three places and filled the gaps and base with brown-tinted fine pumice gel.

Terror and its brood
Here's a bonus picture of the Terror and some crawlers. I like that the tones are similar yet different, with the larger one being darker.

Yardu
Yardu
After the big bad, it was time for the core set's lone mini-boss and only undead, Yardu. For this model, I ended up going back to layering rather than two-brush blending. I have some sense now for both techniques, and I should look for more places to reflect on which one I should use in which circumstances. One thing I've noticed is that I find it easier to place shades effectively when starting with a base coat as in two-brush blending, whereas with layering, I will sometimes "miss" my target base color by either having too much shade/highlight or by a paint mixing error. (Keep in mind that I mix all my colors from a relatively small selection of paints.) Anyway, I am happy with how Yardu looks. How can you not like a skeletal guy who carries human skulls and also paints skulls on his knees and hey that's not enough let's also paint a skull on my helmet?

That's all the villains, so I moved on to the heroes, starting with the two that my son and I were most interested in playing: the Brigand and the Apprentice. Coincidentally, these are the two featured in some of the gameplay videos (starting here) produced by Megacon Games.

Brigand
Brigand
Brigand
First was the Brigand, a kind of a throwback to my Mice & Mystics set. What I've learned since then! Anyway, I had some trouble matching the main fur color with this miniature, and it took several tries to get something that I liked. Here, he may lean a bit more toward grey than some of the artwork, but I think the end result still looks good. No real tricks here. The miniature did not have strongly detailed fur, unlike, say, the wookie from Imperial Assault, so washes were not bringing out much of the texture. I found that highlighting little tufts with short strokes was effective enough for this guy.

Apprentice
Apprentice
Apprentice
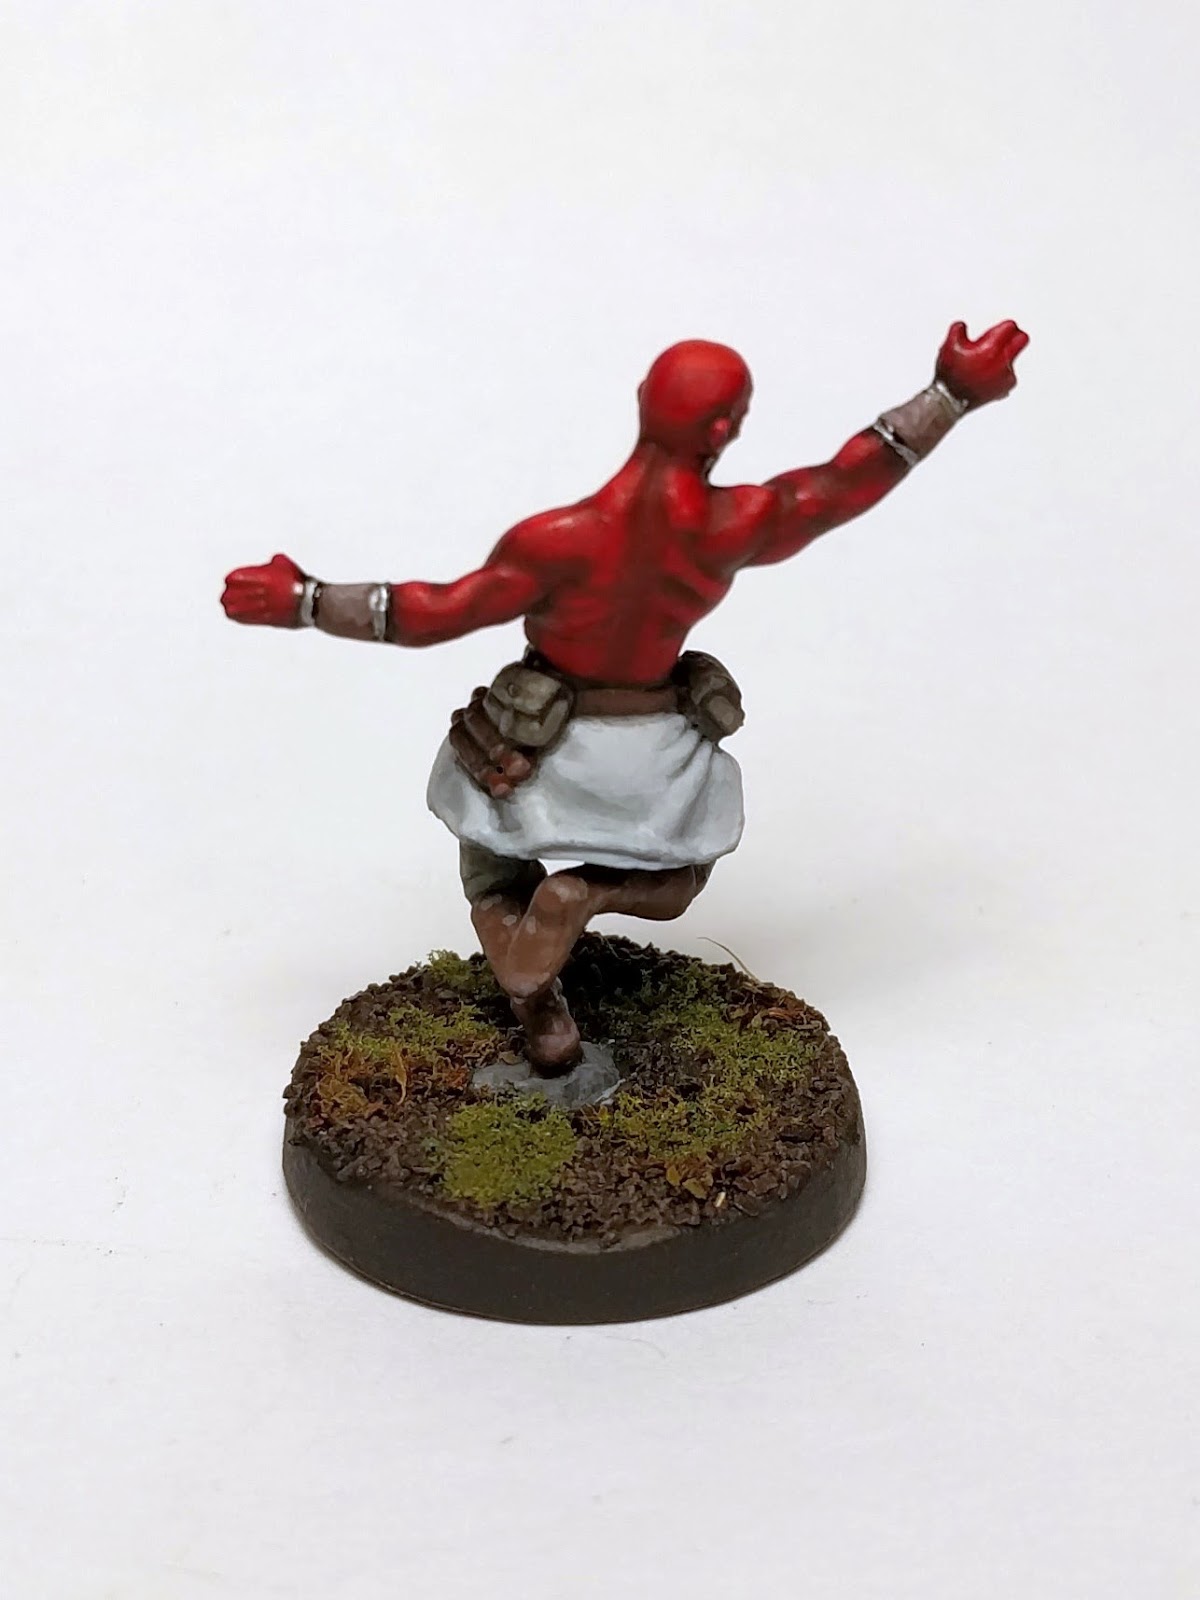
The apprentice was a lot of fun to paint, having a simple bold color scheme. Reds don't intimidate me like they used to since I have learned a lot of tricks for dealing with them. The highlights on the Apprentice lean slightly toward yellow, and deep shadows on the muscles produce good contrast. The white pattern was painted in layers, starting with a light grey and then brightening up only the parts where an overhead light source would reach, and this helps communicate the texture on his torso.

I don't know if my original figure was bent or not, but the miniature was leaning way back. Looking around at others' figures, it's not clear to me if that was how it was supposed to be or not. In any case, I didn't care for it and I wanted to reinforce the join anyway, so I chopped him off and pinned him back on more upright.

At the table
Usually with these projects, I wait until the whole set is completed before letting them hit the table, but my son and I were to eager. Here's a shot of our first game with painted figures and a good understanding of the rules. We were playing the adventure mode and made it to the second tile before being wiped out. I still had a few of the rules a bit wrong, though now I cannot remember which. However, the rulebook does have an interesting disclaimer, stating essentially that you should not interrupt the game to look anything up: you should just play and have fun. I suppose one could always do this with any game, but it's an especially nice caveat to have on hand for a cooperative game. On the other hand, I really wanted to understand the system that was designed here, so I find myself occasionally stopping play to verify items.

Oh, and I found something in the box when we set up the game:
A jerk
So much for batch painting.

One of these things is not like the other
I didn't get a perfect color match on the new guy—he's the one in the middle—but it sure is close enough for a minion. It only exists to be destroyed, after all.

Soldier
Soldier 
Soldier
Here is the Soldier, who is the character my wife played in our first trial game, so he was the next to get painted. Turns out she's been too busy to try the game again, so he remains looking sharp but not having hit the table. What's cool about the soldier? His eyebrows. One thing that's kind of funny to me is that the sculpt has such a distinctive face, for example, the eyebrows, but that doesn't really show up in the card art: he looks more generic-young-fighter-face in the card art. My advice: sleeve your cards and draw in bigger eyebrows.

Back to the painting, I think it turned out nicely. Again, I really like the bold blue combined with the muted browns. The detail is not overdone, which leaves him looking clean.

Notice the really broad stance. Both the Soldier and the Acolyte have wide stances and had their feet molded onto plastic surfboards, which were then pre-assembled to the bases. I thought these looked pretty goofy, and I wasn't sure how to base around them effectively. Turns out, as you can see above, he just barely fits on the regular base, so I chopped off the surfboard and used angled pins to affix him to the base.

Acolyte
Acolyte
Acolyte
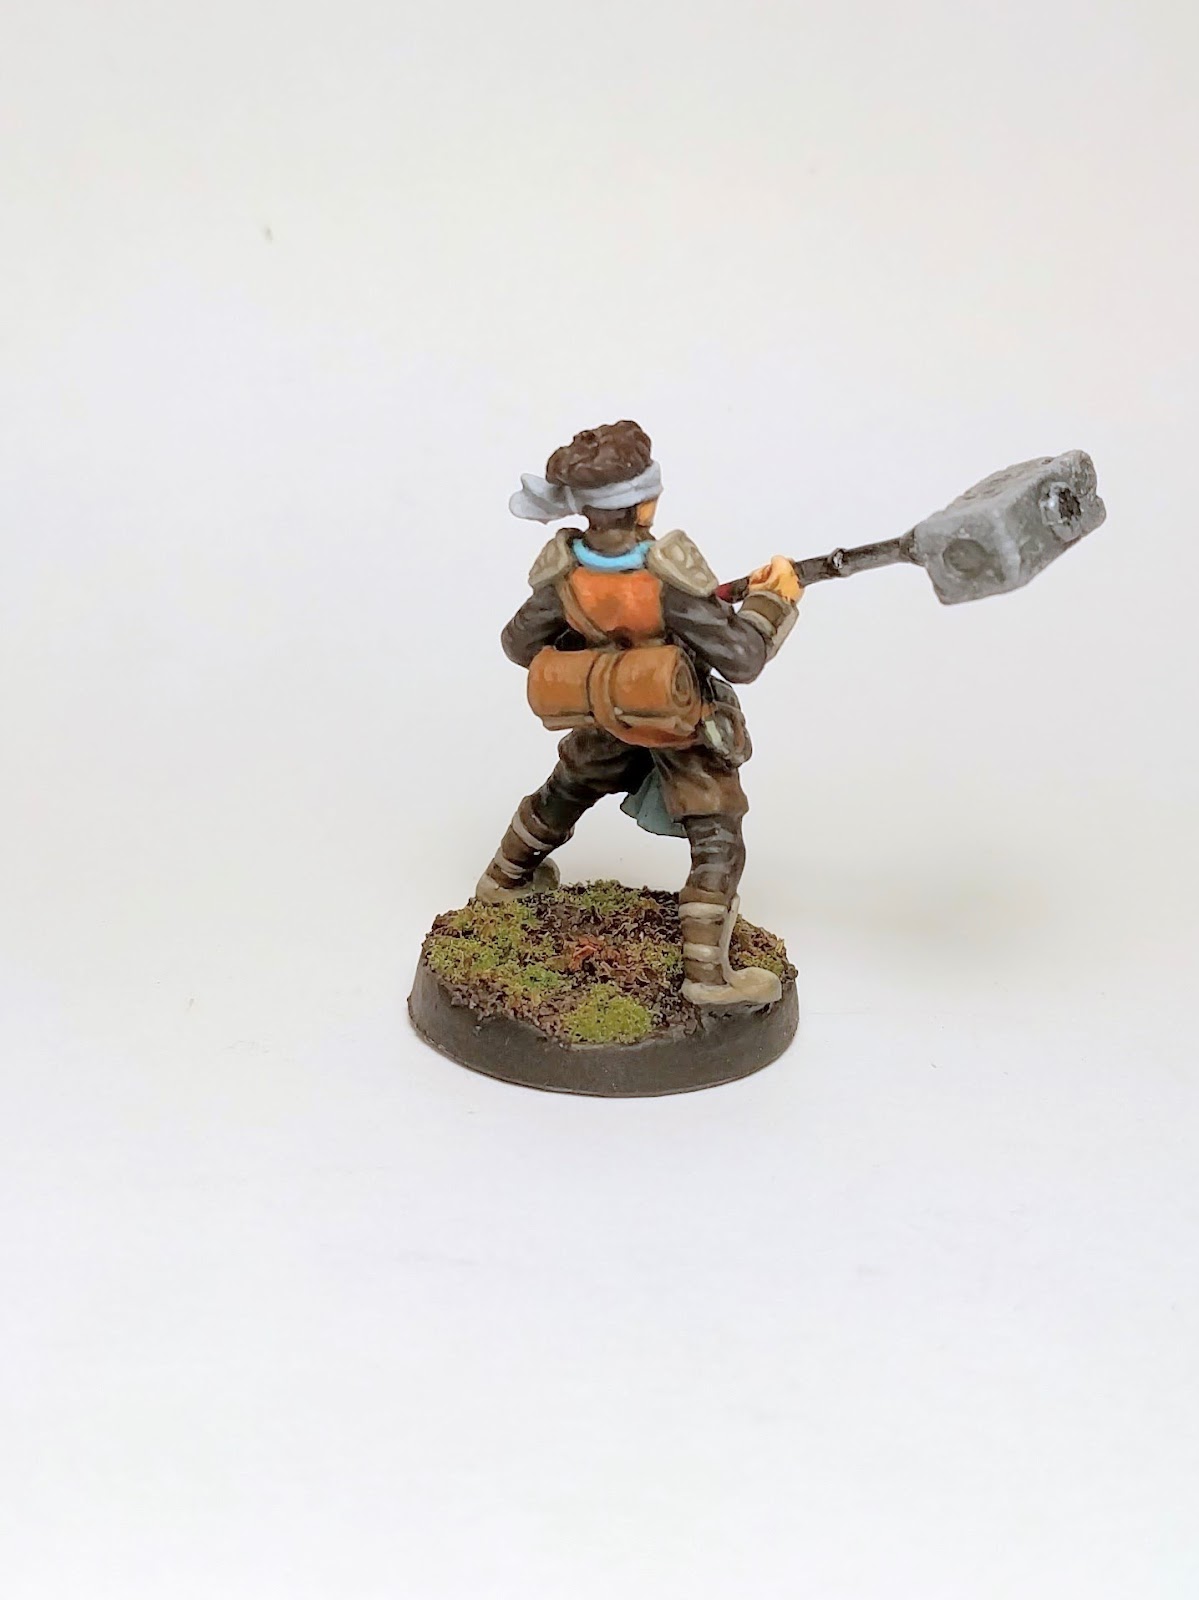
The Acolyte has a lot more stuff going on than the Soldier: crisscrossing straps, bedroll, holy book, multi-part textured weapon, bootstraps, billowing pants, arm guards. This makes him much busier but also more impressive. I love the orange and cyan combination here, but I also understand this is a trendy combination. (Presumably, under the blindfold, he has amazing eyebrows too, but his faith makes him cover them.)

Archer
Archer
Archer
Archer
The archer is another hero with a great dynamic pose. The card art is all earth tones except for this electric blue effect on the tip of her arrow. I decided for the miniature to keep a steel arrowhead but add the bright blue to the fletching.

In the card art, she is holding her arrow in the conventional manner, on the left side of the bow for a right-handed archer. However, the sculpt has the arrow on the other side. I wonder if the sculptor did this on purpose or just doesn't know the conventions of archery? Maybe he watched Lars Anderson's goofy shooting videos too many times? (Nothing against Anderson, though: I bet my students would listen to me if I had that voiceover guy narrating my programming videos, or if I jumped over obstacles during class.)

Tricksters

Tricksters
Finally, these are the Tricksters—the bonus Kickstarter figures I got for purchasing the game at GenCon. Yellow is a fiddly color, and about seven layers into it, I remembered my old lesson: when painting yellow, always undercoat white. My Vallejo yellow has terrible coverage. I went back to Ghool's video on painting yellow, which happens to use the female Trickster figure, and he mentions that P3's moldy ochre has great coverage for undercoating yellow; maybe I'll have to pick some up next time I'm at Wizard's Keep. Aside from the tedium of yellow and the gratuitous straps, these two were kind of fun to paint. I've never done a male/female pair before that have the same colors, but it was easy to set one aside to dry while I used the same colors on the other.

All the Heroes
Everybody
OK, you say, but how is the game? If we don't count the first choppy trial run, my son and I have now played the game four times. In the first game, we were very close to finishing a quest when we were defeated. The next two were extremely short, as we tried a quest that must have been balanced for more players. (Short version: we had to light some torches, but each lit torch brought in more enemies, and we couldn't get more than two lit before being overwhelmed.) The next game, we tried two different heroes in an enhanced story quest from the v1 rulebook. Although we died on the second tile, we were able to actually complete one quest. Here's the takeaway, though: even though each adventure ended in death, we really felt like we did better each time. In fact, the reason we died in the most recent play was because we were both holding back on enhancements that we should have just played to make an important attack on a captain. I think what makes the game so appealing is the tension between card actions, threat, and the Darkness; the Darkness Cycle interruptions are a particularly interesting idea that I hope to see other designers explore.

Another thing to like about Myth is the community. There are a ton of resources on Board Game Geek and the official Myth forums. Also, when I posted a rules question to the official forum, I had an answer from one of the designers within 24 hours.

While I am glad for Megacon Games' success via Kickstarter, this is one of those cases where Kickstarter leaves me feeling a little cold. I remember hearing about their first Kickstarter but wasn't even back into painting then, so I wasn't watching for interesting miniature games. Being outside the loop, I didn't hear about the expansion Kickstarter either. Now I don't need more stuff, and I certainly don't need an expansion if we cannot yet complete a single story quest, but I cannot help but look at the incredible deal that the backers got and be a bit jealous. I guess that's the twist on Kickstarter, never quite knowing if it's going to be something you hope it will be or not. I'll just have to hope that their upcoming Kickstarter campaign for Myth: Dark Frontier includes some deals for latecomers like me.

A final note: I met Brian Shotton, lead designer and co-owner of Megacon Games, and he is a fantastic and authentic guy. I'll have more to say that when I write about my current immersive learning project, but suffice it to say, I'm happy to support his endeavors as a game designer and local entrepreneur.

A crowded tile from that one quest we completed. We'll try again soon.

Friday, September 23, 2016

A bit of Unreal Engine and the Benefits of Source Code

Several years ago, I looked into Unreal Development Kit for use in my game programming courses. At the time, you had to know C++ to get the most of it, and my students generally didn't know C++, so I invested hardly any time in pursuing UDK. I had heard in Spring 2015 how Epic made Unreal Engine 4 completely free for developers, including making the source available. It wasn't until about two weeks ago that I was inspired to take a look at UE4. Turns out, it is extremely easy to access the source and build it on Linux, and so I've been tinkering with a project for two weeks or so. I have been keeping notes about my attempts to learn UE4, and I may blog about that more later.

This story is about how I got some core gameplay working and decided it was time to slap a HUD on the game. I checked a few pages of documentation and proceeded to create my first HUD blueprint. Upon trying to open it, the editor crashed. That's pretty uncommon, so I restarted it and tried again, and it crashed again. That's really uncommon, so I restarted again,  but I asked Google about it while UE4 was starting up. Turns out it's a known bug in the latest release. However, someone posted a workaround, which is to revert a specific commit from the repository.

I've never actually done that before, but a little bit of searching revealed that it was pretty easy. I didn't actually clone the whole UE4 project history, only the latest release, but I was able to get the patch for the commit by appending ".patch" to the github URL. (That is, it's https://github.com/EpicGames/UnrealEngine/commit/8fba9bbdc3cc4105d7c3de24adc94f7304c7d90b.patch, although you need to sign in and agree to Epic's terms to get source access; note that you can do this with any commit URL on github, which I did not know before.) I saved that to a file and reversed the commit via:
git apply -R

Couldn't be easier! Rebuilding the project via 'make' took just a minute or so, much less than the full build. Now, I can edit HUD widgets! I am still not good at it, but hey, we have to take this one step at a time.

Sunday, September 18, 2016

Sources of joy

Six or eight years ago, I went to a SIGCSE talk by Jesse Heines in which he mentioned, offhandedly, that he knew all of his students' names. After the talk, I asked him how he did this, for it was something I struggled with. The trick he taught me is one I've used for several years when teaching larger classes: have everyone write their name on a sheet of paper and take mugshots. He printed his up into a poster, but I just have mine set as a screensaver, so that when I haven't touched my input devices for ten minutes or so, students start flipping through my screen, one second at a time.

Now, it seems if one is going to have students come to the front of the room for a mugshot, then it seems they should say something about themselves as well. I used to ask them to say something about how they first became interested in computers, but this turned too quickly into "XYZ is my favorite video game." Last year, I asked instead for students to share something that made them smile. In one of my sections, it was quite nice, but in the other one, it turned very dark in the dark-comedy sense: smiling at bad things happening to other people.

I happen to be in the middle of C. S. Lewis' Surprised by Joy, and so I've been reflecting on what "joy" is and where I find it. In this spirit, as I set up and explained the mugshot routine, I asked my students to share something that recently brought them joy. To kick things off, I told the story of how the previous day, my one-year-old had picked up a baseball cap, put it cockeyed on his head, had one sandal on, and was lopsidedly parading through the hallway.

I was moved by my students' responses, and so I decided to share some from memory here. Here are some things that bring my students joy, in no particular order.

  • I found out we are getting a German Shepherd puppy.
  • When I was home, I got to see a cousin I had not seen in three years.
  • My kitten does the cutest thing, where it lays on its back and I rub its tummy.
  • I have a Web development company, and yesterday I secured a great contract.
  • My baby said, "I love you" as I left the house today.
  • Last semester, I found a quarter at the bus stop.
  • The new FIFA comes out next week.
  • My friend made an outfit for her cat.
  • I saw a great movie that really moved me.
  • I won a costume contest at a comic convention.
  • I hit max level in World of Warcraft.
  • I am a TA for the intro CS course, and I was in the lab with a student who was on the verge of tears, he was so frustrated. I looked over his code, and it was just missing a semicolon. He was thrilled, and I felt like I really made a difference.
I know there were more, but these are the ones that come to mind as I think through it. Only one student, toward the end, offered the slightest schadenfreude, and that was, "Last week, I saw Jimmy fall off his bike," but at least Jimmy was right there, and they are clearly buddies.

Tuesday, September 13, 2016

White point selection in Snapseed

I was very excited to see the new white-balance features in Snapseed. I use a low-fidelity set-up for photographing my miniatures: I use a white backdrop, lower my painting lamp, and snap a shot with my mobile phone camera. The color temperature was never quite right, and it got worse with my transition to my Nexus 5X. The default camera on the 5X does not support changing the exposure, which is how I used to get slightly better images on my Nexus 4. I have been using Open Camera to photograph my miniatures since it allows for manual setting of light quality as well as macro focus, but even here, the temperature was often wrong.

Of course, I can always download my images and use Gimp to select a white point, but this makes photographing and sharing process much more cumbersome. Going this way, I would have to download the images, process them in Gimp, export them, and re-upload them to Google Photos—and remove the old ones to eliminate clutter—just so that I can easily share the images here on my blog and over on the Facebook. When I spent hours with my new Nexus 5X looking for solutions, I asked, "Why don't any of these mobile photo editing tools allow white-point selection?!" (Yes, I even went looking for algorithms to see if I could just write my own!)

One of the tools I tried was Snapseed, and I never got around to uninstalling it. I know it updated the other day, and when I opened it, I saw a little "new" marker by a WB button. Hope against hope, could it be? Yes! The new white balance tool allows picking of white points! It required a little poking around to see how to back up the Snapseed images into Google Photos, but now I think I have a good workflow.

Here's an example. I just finished up my two Stalkers from Myth—a GenCon acquisition that I played once and decided deserved a nice paint job. The big, round surfaces of the Stalkers gave me a great opportunity to practice two-brush blending, and I am really happy with the results: I think it's some of the smoothest blends I've ever painted. I took a photo and shared it to Facebook:


They look nice, but the temperature is all wrong, like so many of my photos posted here. This was the impetus to check out the updated Snapseed. One white point later, we get this:


That is much better! I think they still look better in person, but for my cheap-and-easy photography set-up, this is a huge improvement.

Thanks, Snapseed team!

Monday, September 12, 2016

Is there a fix for the first three weeks of CS222?

We just finished the first three weeks of CS222, and the truth is, I don't like it. There's so much to love about this course, but it all happens after the first three weeks. Indeed, I think by the end of the semester, I'm generally content with the course, so I tend to forget how these first three weeks need attention.

This semester's course description lays out a plan much like I've used in past semesters. The first three weeks consist of a rapid introduction to course topics while students complete a series of three assignments. The next two weeks are devoted to a two-week project, where students work in pairs on a challenging project, bringing to use all of what they learned earlier in the semester. The final ten weeks are devoted to the final project—a project created by teams of undergraduates and completed in three iterations.

During these first three weeks, there's too much of a disconnect between the assignments and what I'm talking about in class. It works fine when students are keeping up with the reading and asking good questions, but that seems to only happen by chance, not by planning. Each assignment asks students to refactor with increasing sophistication, and I'm also asking them to look at either their own "legacy" code from previous semesters or Open Source code. I can tell that a great majority of them are trying to refactor on paper, without the help of the compiler, but almost none of them have the experience to pull this off. (Indeed, they don't have the experience to recognize that they should be using a compiler to check their work!) Because they are focused on the point-granting assignments, I am sure it is very rare that they take my end-of-class advice, where we are working on a case study and I say, "Try writing the next test yourself!" or "See if you can fix that UI problem." These mini-challenges never come up again: no one asks about them, unless it's me in the next class, when I am met with blank stares. This leads to what always strikes me as the most significant problem for our Advanced Programming class: in the first three weeks, the student are not programming. In particular, the weaker students are not getting the practice they need.

Before using three weekly assignments, I used to give daily assignments in CS222. This actually worked very well, in part because I could tweak them based on what we did in class. Why not just go back to this? Well, the course used to be Tuesday/Thursday, so that meant two assignments per week, and we used to have half as many students. Now, we have an exciting growth in majors, and despite my protestations, CS222 is now MWF. If I gave daily assignments—the interesting kind, that require me to read and give thoughtful feedback—I would drown in grading.

I am certainly open to suggestions, but really, the point of this post is not to plea for help but for me to remember today's thoughts in ten weeks when I'm prepping for Spring. In that spirit, here are some of the ideas I've had about dealing with this.

  • Request a teaching assistant for the first few weeks of the semester. I generally have avoided them because I like to know what my students are doing and to give them expert feedback. If I could get a teaching assistant who has taken my course, though, maybe I could get them to do some of the more menial checks.
  • Use more tooling to help with identifying refactoring opportunities. What if we had a static analyzer that would flag students' code based on some heuristics of code quality? For example, Clean Code talks about avoiding nested control structures: that's imminently detectable, but we would need to have the right tool to do it, and that would mean teaching yet another new tool to the students. (Also, I am not sure that this is better than learning to see it yourself, similar to how using spellcheck doesn't help you actually learn how language or spelling work.)
  • Incorporate peer-evaluation. I did this a few semesters ago with achievements, where students needed to get peer-approval before sending work to me for evaluation. It did not work at all, in part because there was no incentives for evaluators to know what they were talking about. That's a systems problem, and I could try to improve that system, but I fear that this approach still leads toward blind-leading-the-blind.
  • Remove the requirement that students find their own code to evaluate. The reason for introducing this was twofold: first, it gets students thinking about Open Source code; second, there are no issues of copying, since each student is doing different work. If I were to, say, create some repositories of code with Clean Code violations, then I would know that they can easily check it out (learning fundamentals of git) and actually run it in the IDE—and I could even provide unit tests! However, then the whole class would be working with the same code, and that invites the weaker students into the temptation of not thinking through the hard problems for themselves.
  • "Flip" the first three weeks more aggressively, moving more presentations to YouTube with graded clicker-style multiple-choice questions at the beginning of class. This would eliminate the assignments entirely, but it has this problem that the clicker-style questions don't get at the kind of process knowledge I want them to be developing.
  • Completely change the first three weeks, having them do individual programming assignments, relatively simple ones to make sure they know core Java ideas, and evaluate these on strict subsections of Clean Code. This probably would not take much more effort than what I am doing now in terms of reading and giving feedback. It echoes the problem above, though, that it could tempt the students who most need the practice to copy approaches rather than apply the processes we're trying to learn.

Thursday, September 8, 2016

CS222: Teaching students to talk to the client

The theme for the second week of CS222 was Test-Driven Development, particularly the process of determining what test cases should go onto a Beck-style to-do list. I chose the context of a simple text analyzer—a tool with a simple JavaFX UI that takes input text and does some computation over it. The first example I walked through was word counting, just breaking up a string based on whitespace.

The second example I chose was average word length: given a string of words, what is their average length? I explained this to the students and, as an in-class exercise, they broke into ad hoc groups and started coming up with test cases. I gave them fifteen minutes or so, and then we shared our lists. Many of the groups realized that, in order to do average word length, we needed to be able to compute word length, although none of them explicitly extracted this as a separate problem. As they started sharing their test cases, they realized there were ambiguities: some groups were counting apostrophes and dashes as part of the word length, and some were not.

This was a great hook for me to intervene and talk about the dangers of assumptions. Rather than make something up that they wanted, they need to work with the client—or, in this case, the professor as client-surrogate. We also talked about how working on one task may reveal another dependency, and that we can make a separate TDD task list for that. We had some time left, so I told them to shift gears: come up with the list of test cases one could use to write a word length function.

They started, and I wandered the room, giving them about five minutes to complete the task. Then, I stopped them, and informed them that they had all failed. The students looked up at me with a combination of confusion, terror, curiosity, and amusement. "Why," I asked, "did you all just fail?"

With a smile on her face indicating she knew exactly what had happened, a student said, "We just made stuff up. We did not ask the client how word length should be defined."

"Exactly."

It was one of those moments where you can feel the learning in the air.

I wrote down a shorter version of this story in my notes. It was a happy accident this time, but I think it's something I'd like to try to do again.

Monday, September 5, 2016

Playing Frostgrave and Family Terrain Crafting

I don't remember where I first heard about Frostgrave, but I fell in love with the idea of a fantasy-themed skirmish-level wargame that I could play with the miniatures I already have. I have been painting for almost three years now, and so I've built up quite a collection of good-looking miniatures who never see the table. I ordered the rulebook over the summer, and my eldest son and I started a campaign. I created an Enchanter, using my Ezren miniature that I painted for the Pathfinder Adventure Card Game. I expected my son to go with something like an Elementalist or, given his penchant for buying undead creatures, maybe a Necromancer. He actually went with a Witch, I think in part because he had a nice Feiya miniature he painted up a while ago. To play the first game of our campaign, we simply raided the box-o'-blocks and made sure not to have long lines of sight.

First game. Watch for the Statue of the Mayor in the middle of town---the orange conical shape with red tip.
Ezren bravely hides behind a wall
We had a fantastic time, each of us securing three treasures, building strongholds, and leveling-up our wizards.

For our second game, we added some height-variation. The changes in elevation added a lot to our enjoyment. I came away with four treasures to his two, thanks to the amazing enchanter spell, telekinesis.
We actually got part of the climbing rules wrong, but we still had fun jumping and running around the multiple levels. Also, a good view of the Statue of the Mayor in the center of town.
A frost giant, played here by an Ettin, appeared right in the middle of my reserves. The archer and war dog are about to take one for the team.
Our board designs got a bit more sophisticated as we moved to our third game, and this was also where we started using scenarios from the book. This is the Worm Hunt, where there's a chance each turn of a giant Herbertesque worm emerging from the ground and attacking the treasure hunters. I feel kind of bad about this one, since a worm came up right around my son's guys, and in an amazing twist of luck, he got it down to one health. He sent in his war dog to finish it off, but missed (and the dog was eaten). I won initiative and was able to pick off the worm's one health for the XP reward. We both agreed it was lame but also that there was no good reason not to do it. He is very gracious, and I got away with four to his two again, plus two giant worm kills.

More of a ruined city, especially in the front and center areas of the right-hand side.

The view from the famous Statue of the Mayor's Dog
Our fourth game involved a scenario with a magical well in the middle of town. We envisioned it as a market center, with an old grand arch and ruins around it, including a collapsed temple and stores. My wife walked through the room and commented that this was our "best-looking" table yet. I agree!

The paper strips are Fog markers. We both have the spell and end up with a lot of fog on the board.
Around the time we started playing Frostgrave and realized we both loved it, I started looking for cheap terrain or tutorials on how to build the same. The search for the first is easy: there really isn't any "cheap" terrain. We looked at some options at the exhibit hall of GenCon, but nothing really caught my eye. I turned to YouTube and ended up watching several videos by Mel the Terrain Tutor, which were really helpful. In particular, his series about making cheap terrain using foamcore is excellent; I look forward to trying these techniques sometime, although some specific elements of his design are more modern-urban than the kind of fantasy-urban we're going for in Frostgrave. I came across Luke's APS purely by chance, and I find his cheerful demeanor infectious, and he pays special attention to making things nicely but cheaply. However, It was watching Mel's videos where I first heard about DMG and, more importantly for our purposes, DM Scotty

DM Scotty has a two-part series (part 1, part 2) on how to build cheap ruins, mostly from ruins and hot glue. Oh my, does this guy have a lot of uses for hot glue. I've used the stuff to hold my miniatures to corks for painting, but that's been the extent of my adult experience with hot glue, ... at least until a few days ago. My son and I watched his videos and decided that we would give it a shot. Family crafting time!

In the videos, DM Scotty uses two-wall corrugated board for the main body of the ruins. We only had single-wall, so we started by just gluing cardboard flats together using some white glue. I took a tip from Mel's video about cheap basing materials and turned the corrugations orthogonal to each other, hoping that this would give a solid body. Then, we set to cutting out our shapes and hitting the hot glue. For most of these steps, I went first, and my son gave it a shot next, although he would frequently remember things from the video that I didn't. In both pieces, I think we were both a bit overzealous with the vertical glue effect, reflecting our exaggerated recollection of the video: DM Scotty's is much nicer, and so shall our next pieces. We also didn't remember his trick of adding more cardboard verticals to appear like support beams on the walls. Again, a note for next time.

Mine's on the left, with the doorway cut out. It also has a small second level, which you cannot really see here.
After a trip to the store to pick up some all-purpose sand, we added texture to the pieces using white glue and sand. We also used play sand to fill in the corrugations on the side, which does indeed make the finished project look more like a ruins than like a corrugated cardboard!


I took these outside and painted them black using some black primer spray paint I have for miniatures. The weather here in Indiana is not always good for outside spraying, but we hit this at just the right time.

Next up, we used some sponge-brushes to stipple on our medium grey and light grey highlights. I dabbed much of the paint off of mine, leaving a much darker color. My son had a lot of paint in the sponge, and so even stippling, he got a lot more paint on the walls. He also took some time to paint on some cracks, but I decided to skip that step, in part because my overzealous hotgluing didn't leave a lot of central surface area.


We added some burnt grass flock that I had from painting miniatures, something I often use with my grey-rubble bases as a subtle accent. My wife pulled out some assorted mosses that she acquired for an amazing ent costume she made my second son for Halloween last year, and we used these as the finishing touches. 

Here are the final results!


While we both agree that there are things we would do differently, we are also very proud of our first terrain pieces. I'm sure we'll make time in the coming days to use these in a Frostgrave game.

I am reminded of what I wrote about when I first returned to the miniature painting hobby. When I was young and playing a lot of D&D, we didn't have a lot of resources to connect with a community of players. Now, it's amazing what you can learn from a combination of YouTube, reflective practice, and whatever your wife pulls out of the closet. I am grateful for guys like Mel, DMG, DM Scotty, and Luke for what they bring to amateurs like us—a family that enjoys playing and crafting together.

Cheers!